It is officially day 21 onboard the R/V Point Sur, and… wait, is that… Land ho, land ho! Though it is a bittersweet time, demobilization of the cruise is a certainty. The science crew has concluded their work, gear has been packed up, and the deck swabbed. The only things left to do are unload it all and wave our white handkerchiefs in goodbyes. What else is there for it but to get started!
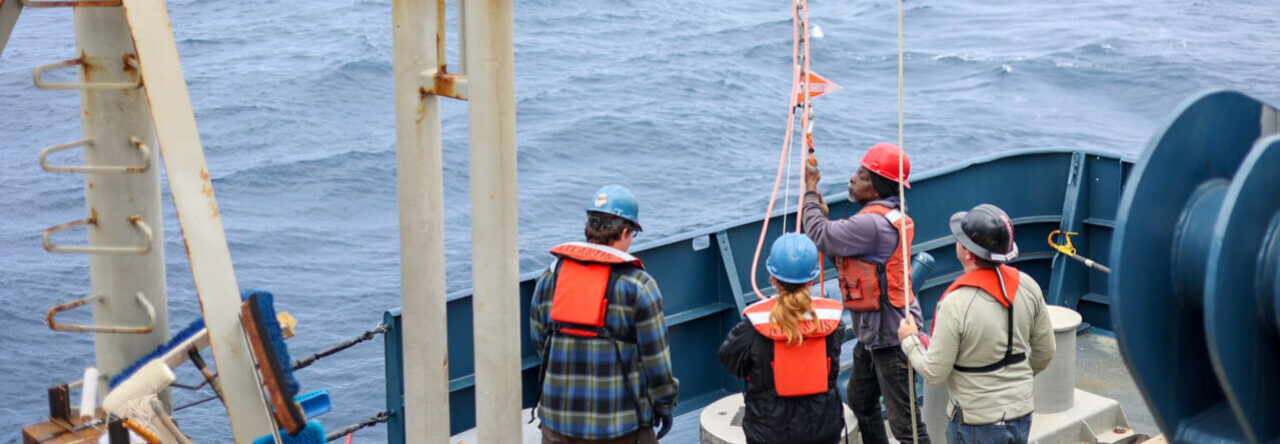
Science brought aboard their own winch with matching block. It is no small endeavor to take it back down, requiring two men to climb the A-frame, one to operate the crane, and at least one more on deck to help facilitate. Equipped with safety harnesses, the climbers take to the frame and attach the crane hook to the extremely heavy block. Once detached, the crane can support said weight and lower it to the ground. The ships standard block is put back into its rightful home, and our courageous climbers can make their descent.
Hey, that looks like fun! Seeing the strength and importance of the crane for this operation gave my mentor Grace an excellent idea: “Let the new guy try it!”
Though I am certainly still hesitant, I can now confess that I have a rudimentary understanding of crane operations. I wouldn’t quite trust myself to move anything too important, but it is a skill I look forward to cultivating more in the future. Having a multitude of people on the ships crew that know how to operate machinery can be a life saver! This ensures that at any one time, you can find a crane operator that is both on duty and not actively involved in another operation.
For deploying the ROV, the crew had attached a soft line to the end of the winch wire. While it worked perfectly for the operations of the cruise, it was no longer needed. For removing the line, we set up a clever little DIY station. All it takes is a boat hook and an empty spool, and spinning away we went! The line was coiled up for storage, and the tarp removed from the winch spool. All ready for the next cruise!
To complete our offloading, we needed a crane with a bit more power than the ones on board posses. We mosied on over to the port pier, where we could have some help with the lifting. This is the first time I have seen the forward crane used, to lower the gangway off of the bow. Unlike the crane on the back deck, this particular model has two ‘knuckles’. With two places to bend, it has a greater mobility but also requires greater skill to operate. Skilled crane operator mark slowly lifted and lowered the gangway to the pier, where forklift driver Grace could position it.
With demobilization of the cruise coming to an end, we began preparations for the next scientific mission. Part of our maintenance included cleaning! The whole boat gets a decent scrub down, and the tech lab gets a good polishing. We opened up some of the computers, and dusted out the insides with a high powered blower. The high seas have some serious dust!
A little back story no one asked for:
The Pt. Sur is the sistership to my school’s vessel the Cape Hatteras. A dream I always had while sailing on the Hatteras was to climb the mast, or the yellow ladder as we called it. For liability issues, obviously I was never able to as a student.
Though this mast did not include a yellow ladder, I finally was able to summit my mountain of the mast and had a little climb up while in port! Grace ensured I was harnessed in for safety, and up we went. It was a great view of the port from the top! Even though it is by technicality only, I can finally say I’ve seen my white whale.
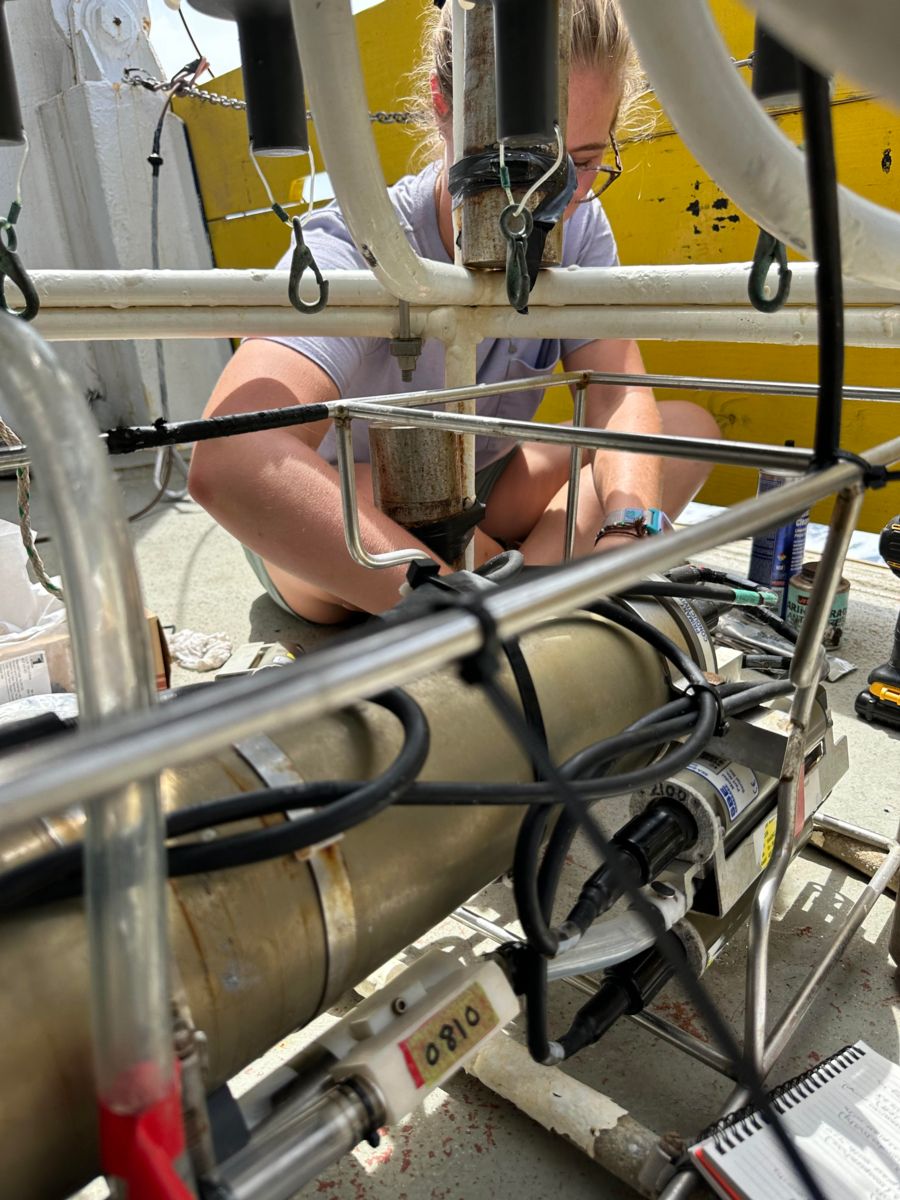
Now that mobilization of the next cruise had begun, gear was being moved to the ship in preparation. This is the primma donna of our mission- the Megacore. Even though the name sounds like something out of the Transformers movies, it has a fairly simple purpose. Mud is the name of the game, so much so that this science group refers to them selves as “The Mud People”. Equipped with 12 plastic tubes, this rosette sinks all the way to the seafloor to grab mud. All going well, we pull it back up with 12 perfect cores of mud. Fingers crossed!
The sight of this screen first thing in the morning makes you rub your eyes and wonder if you ever woke up in the first place! This seeming gibberish means that something is amiss within our software setup. It turned out to be a simple baud rate issue. Phew.
The lovely gentleman sitting next to Grace is Roy. He came aboard to help us set up the gear and ensure everything is working. Much like the previous trip, this group had brought a transducer to be mounted the the ships pole. This transducer specifically tracks the mud core as it sinks, which relays an accurate position of the mud sample. It takes a surprising amount of configuring to achieve this!
With all gear stowed, electronics set up, and science crew on board, it was time to head out! Even during transit, there is never any time to waste. The Megacore can be a finicky machine- every piece and part must be perfectly aligned and set in just the right way.
It was with baited breath and a stern glare that we deployed the core for the first sample of the trip…
The anxiety was well deserved, but as all things do, it worked out in the end. We successfully recover the core, and 11 out of the 12 tubes were full of delicious and delectable mud samples! Once the gear is on deck, it is an immediate all hands in to get the mud processed before the next station can begin.
The cores themselves detach from the frame, where they are photographed for documentations sake. Caps are added to each end of the tubes and sealed with tape to ensure no sample material is lost. One of the coolest aspects of these samples, in my uneducated opinion, is that the core also collects the water immediately above the sediment as well. This means that any benthic critters hanging out in the water come up with the mud! We got to see some polychaete worms in one tube, which are some of my favorite animals to witness. What a rare treat to see our wiggly little friends from the abyss!
The water is siphoned from the tubes for filter sampling, and then the mud processing begins. Some tubes are kept whole, to look at the layering of sediment, and some are chopped up into perfect 3 centimeter mudcakes. This allows the scientists to look through the material thoroughly. It’s messy work, but it looks pretty fun!
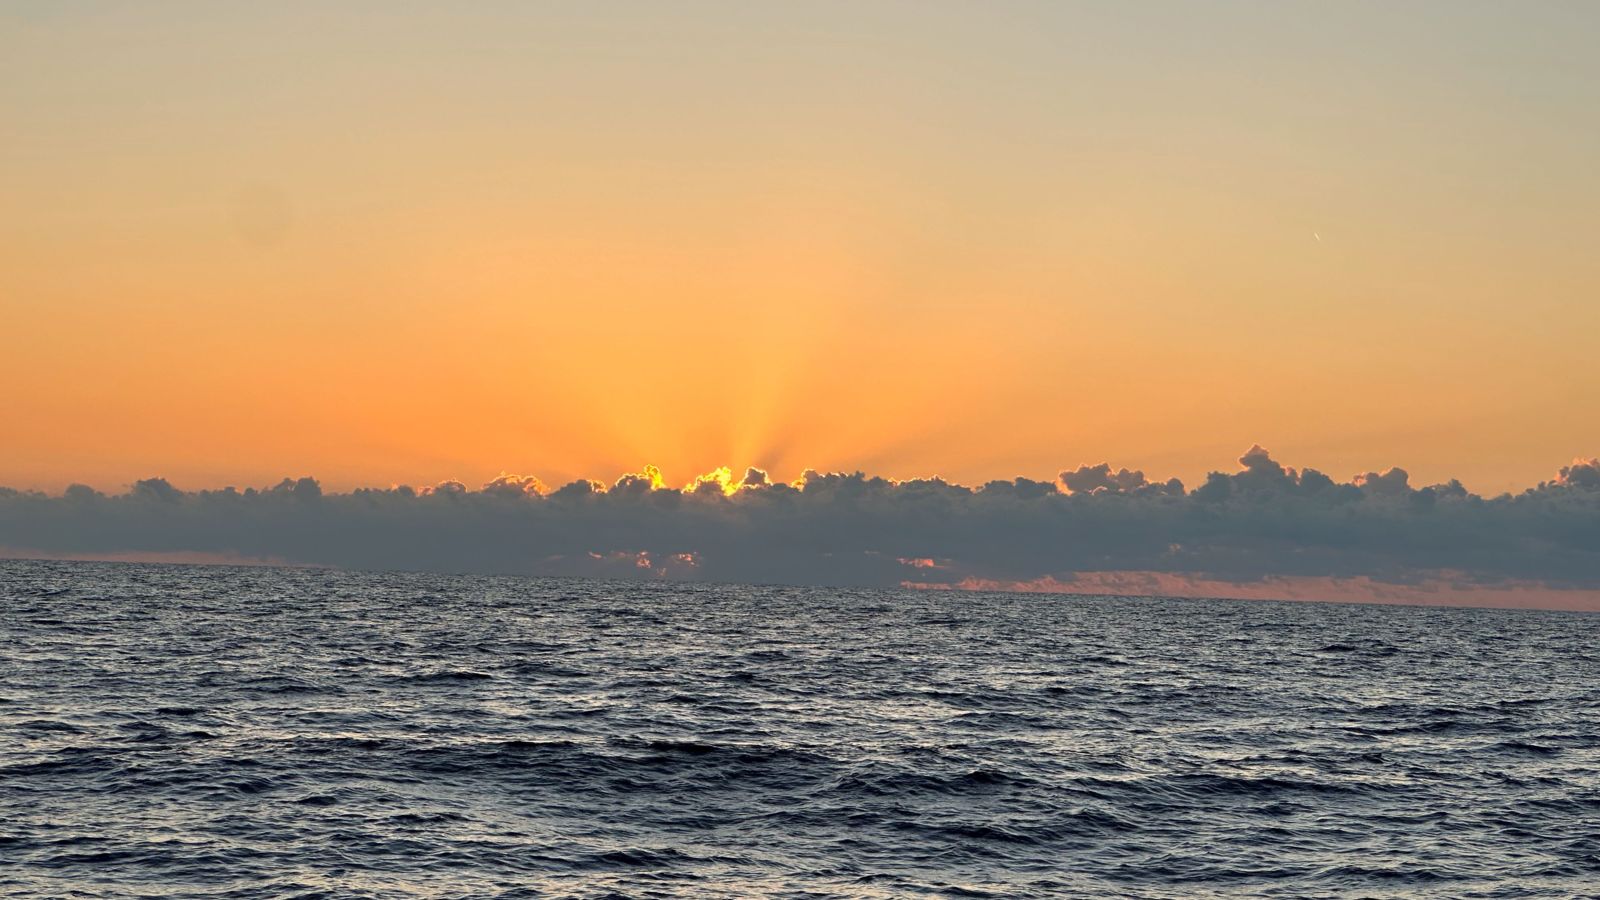
As the mud crew clean out their final cores for the day and turn to bed, a gorgeous sunset signals our time for the week has ended. Though a great deal has been accomplished, there is work yet to be finished! I’m hoping to find some wormy friends in the mud, and maybe even find friends in my fellow shipmates. Who knows! Until next week…
Welcome back everyone! It is now my second week aboard the R/V Point Sur. Morale on the ship is high as science is rolling smoothly, the weather has calmed down, and we all wear our matching Hawaiian shirts on Fridays! Let’s take a look at the week, shall we?
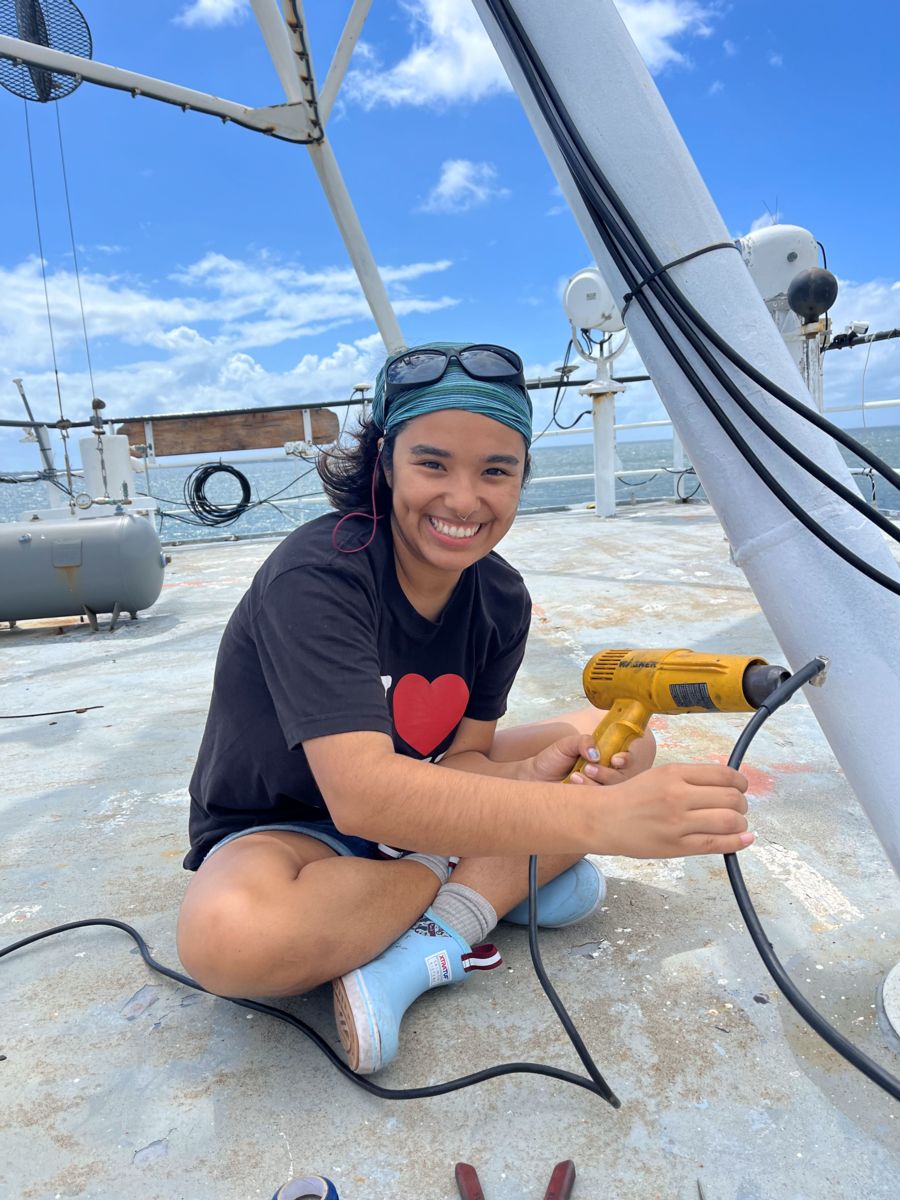
To get my day kicking, I always like to go straight for the power tools! Yippee! The winch wire is more than just a long line of tough metal- it’s special metal. On the inside of the slightly rusty exterior, is an electrical communication cable that is able to send data back and forth to equipment and sensors. This enables whatever we send into the water to communicate with us in live time! To connect the wire to equipment, we must make a connecting end called a termination. This process is begun by dremelling off the hard exterior layers as you see pictured. (Hi me!)
After the metal is removed, you reveal the inner wires which are coated in rubber insulation for protection. Once you have your winch wire and the cable for your equipment ready, you begin the process of joining them together. The wire is soldered together, and tested for communication. Once it is confirmed they can ‘talk’ to each other, you have to make a semi-malleable shell to protect this connection. It’s going in the ocean after all!
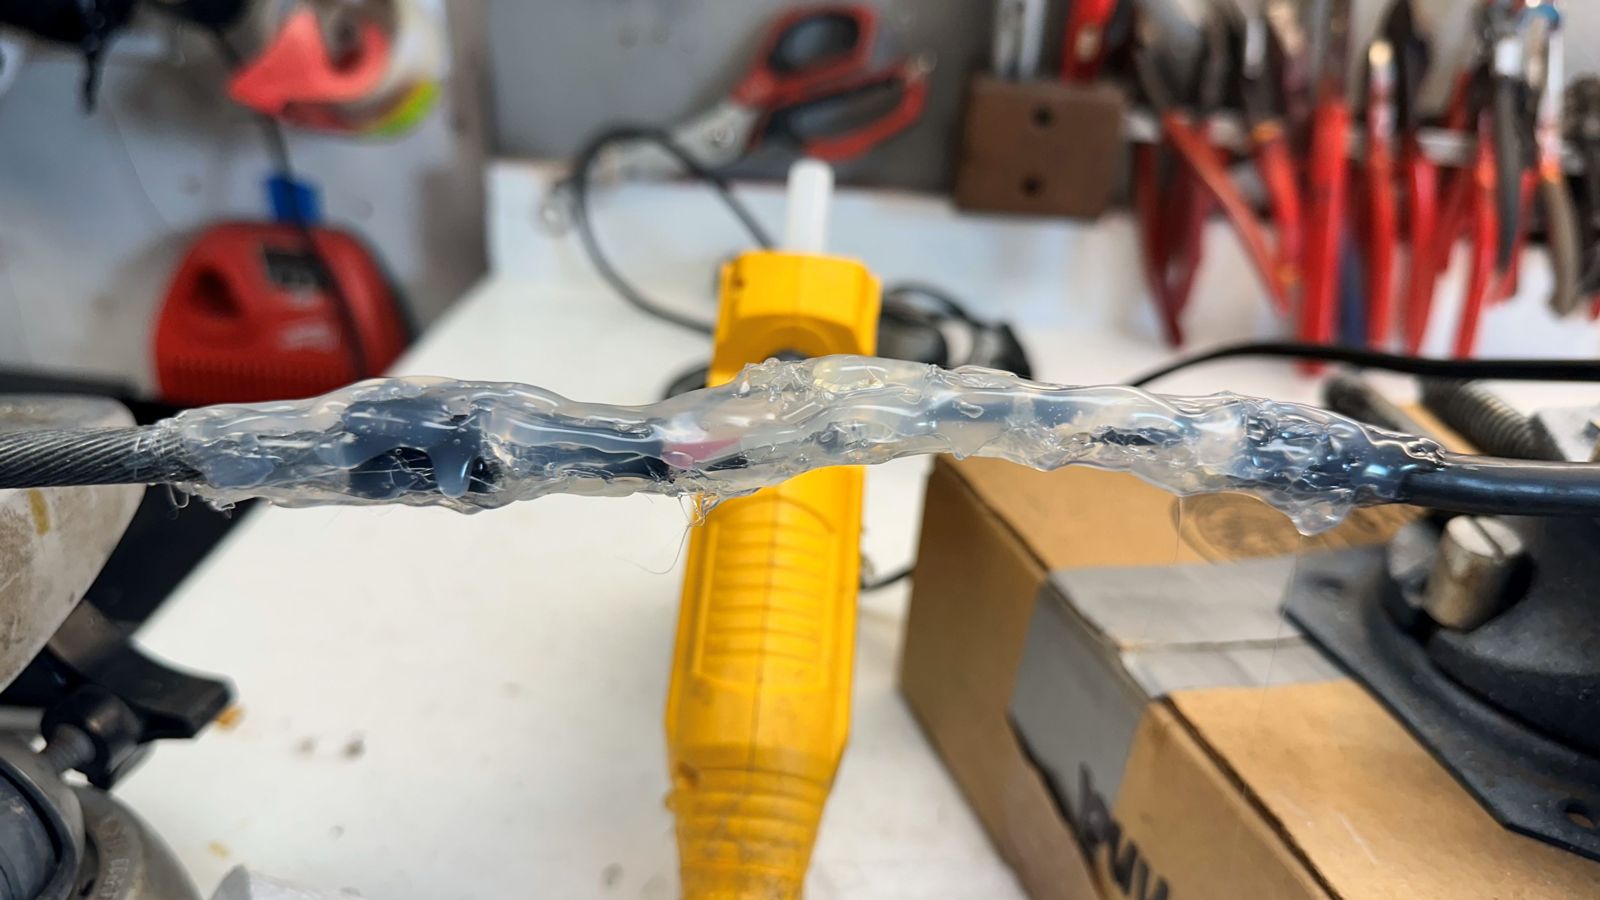
Heat shrink, many layers of hot glue, and electrical tape are the ingredients in this special recipe. These onion like layers work in tandem to offer protection from water, cross talk between cables, mechanical strength and shielding, and ensure that the termination lasts for many, many casts.
The ROV, affectionately named “Mohawk” by the team, has been swimming nonstop these days. While piloting over a smooth seafloor with limited obstructions, the ROV team decided it was a safe place for test drives! Anyone who wanted to was allowed to pilot the ROV and get a feel for the operation of the machine. With a simple videogame style joystick, Mohawk can move in 3D. Being covered in cameras and lights, the vehicle is surprisingly nimble and well equipped to navigate the dark and often murky depths.
Deep sea ROVs have been a passion of mine for quite some time, and piloting one has been on my science bucket list forever- CHECK! A huge thank you to the Mohawk team for allowing me to achieve one of my science dreams!
This screen may look like gibberish- and that’s because it totally is! This is a classic “blame the intern” moment, but allow me to back up a bit. When performing a CTD cast and sending the rosette down, we get a live stream of data from the sensors. The instrument package is connected to the winch wire with the same hot glue termination as previously displayed, allowing data to stream back to the computers shipside. This screen is where we watch the data come in, see how deep in the water the rosette is, and any other information we need to know while operating the machine. Those wide streaking lines however, are not normal. Why is my graph broken!
In this CTD software, there are a few steps that must be taken prior to launch. One of those steps includes turning the water pumps on. You know, the one that pushes water past all of the sensors. Kind of the important part. Yeah, so I forgot to turn those pumps on. My bad team.
When we recovered the CTD, we noticed this- a busted O-ring! My arch nemesis returns, the faulty niskin bottle… thankfully, its a quick little swap and all is well. Daily checks and routine maintenance are an often overlooked aspect of keeping life at sea running, but they are ever so important! Making immediate repairs, and ensuring all equipment is working well with each use keeps the malfunctions and disasters at bay.
These gloves were made for workin…Goop!
Oh yeah, we’re doing ROV ops! One of my jobs on the back deck is to keep a wrastle hold on the winch wire as mentioned in my last blog. This is a much thicker winch wire than what the boat usually has onboard. When in use, these wires must be heavily greased for corrosion resistance and for smooth recovery and deployment. This makes handling the line a bit of a sticky situation. The science crew brought their own pair of sacrificial grease gloves for me to use, which keeps my normal work gloves looking spick and span in comparison!
Let’s take a better look at whats happening when we deploy Mohawk. The winch wire I have been handling comes out of a large pulley hanging from the A-frame at the top, just like the empty one that is hanging in the picture. It is raised and lowered with the winch spool by the winch operator.
Attached to the end of this thick line is the “clump weight”. Pictured in my previous blogs, this weight acts as a landmark for the ROV, and is covered in lights and additional sensors. From the weight, the ROV has maybe a hundred meters of tether line attached to it. This keeps the ROV communicating, and ensures that we can’t lose the little guy even if steering and propulsion of the vehicle fails. We could just drag him up by his tail, worst case scenario!
When we deploy, we first send the ROV into the water and allow the tether to ‘pay out’, or unspool into the water. After the ROV is driven away from the ship as far as it can reach, we can safely send the weight to the seafloor. The two sink down to depth together, holding hands. Once the weight is settled securely, and the ROV operators have their bearings, it’s off to explore!
Coral!Marker!FISH!
The ROV has spent considerable hours in the water this trip which has been an absolute delight. The Mohawk teams focus is mainly on this white coral, that really loves to take over these shipwrecks. They collected a huge assortment of samples for studying!
Other important places to see are the yellow markers. They are named and cataloged, and every time they visit they redocument the same place. Over time, they are able to see how the feature shifts and changes, and how the animals grow or die.
The ship wrecks may be one of the most fascinating things I have seen on my adventures so far! This little guy is called a Blackbelly Rosefish, or Helicolenus dactylopterus. He is sat right on an old bollard of the ship, like a king on his throne! We saw many of these guys and a wide assortment of other spectacular species.
Once the ROV is back on deck, the science crew has a field day with their samples. They are examined, photographed, cataloged, and stored properly. The lab becomes a busy space when samples are being processed! I have thoroughly enjoyed watching the limitless passion and curiosity driven brilliance at work on board this cruise. It is inspiring to see so many intelligent people coming together in big ways.
Many ships have the ability to install what is known as a “transduer pole”. Thie is simply a large metal pipe, that can swivel up and down over the side. At the end, the scientists can attach any transducer they need to have in the water for their operations. This allows for a very easy installation of sensors, rather than trying to find a way to mount them to the hull of the vessel. For this cruise, we used the pole for one small transducer, which helped with positioning of the ROV.
When the pole is in the water, we have to reduce our travelling speed for vibration and drag. Meaning, when it is time to steam to the next site, we use the crane to lift the pole from the water and secure it upright. As we wrapped up this cruise, we secured the pole out of the water, and science was free to remove their transducer from it.
With ROV operations finished for this cruise, we began steaming back to the dock. When we arrive, busy days of offloading the ship will begin, and the next science crew will come aboard. I can’t wait to see what the next cruise will hold, so come along with me!
And just like that folks, we’re back at it again! This time, I hopped aboard a flight headed for Gulfport, Mississippi! The flash temperature change from the arctic to the deep south has me feeling like a defrosting lizard, but that won’t stop me!
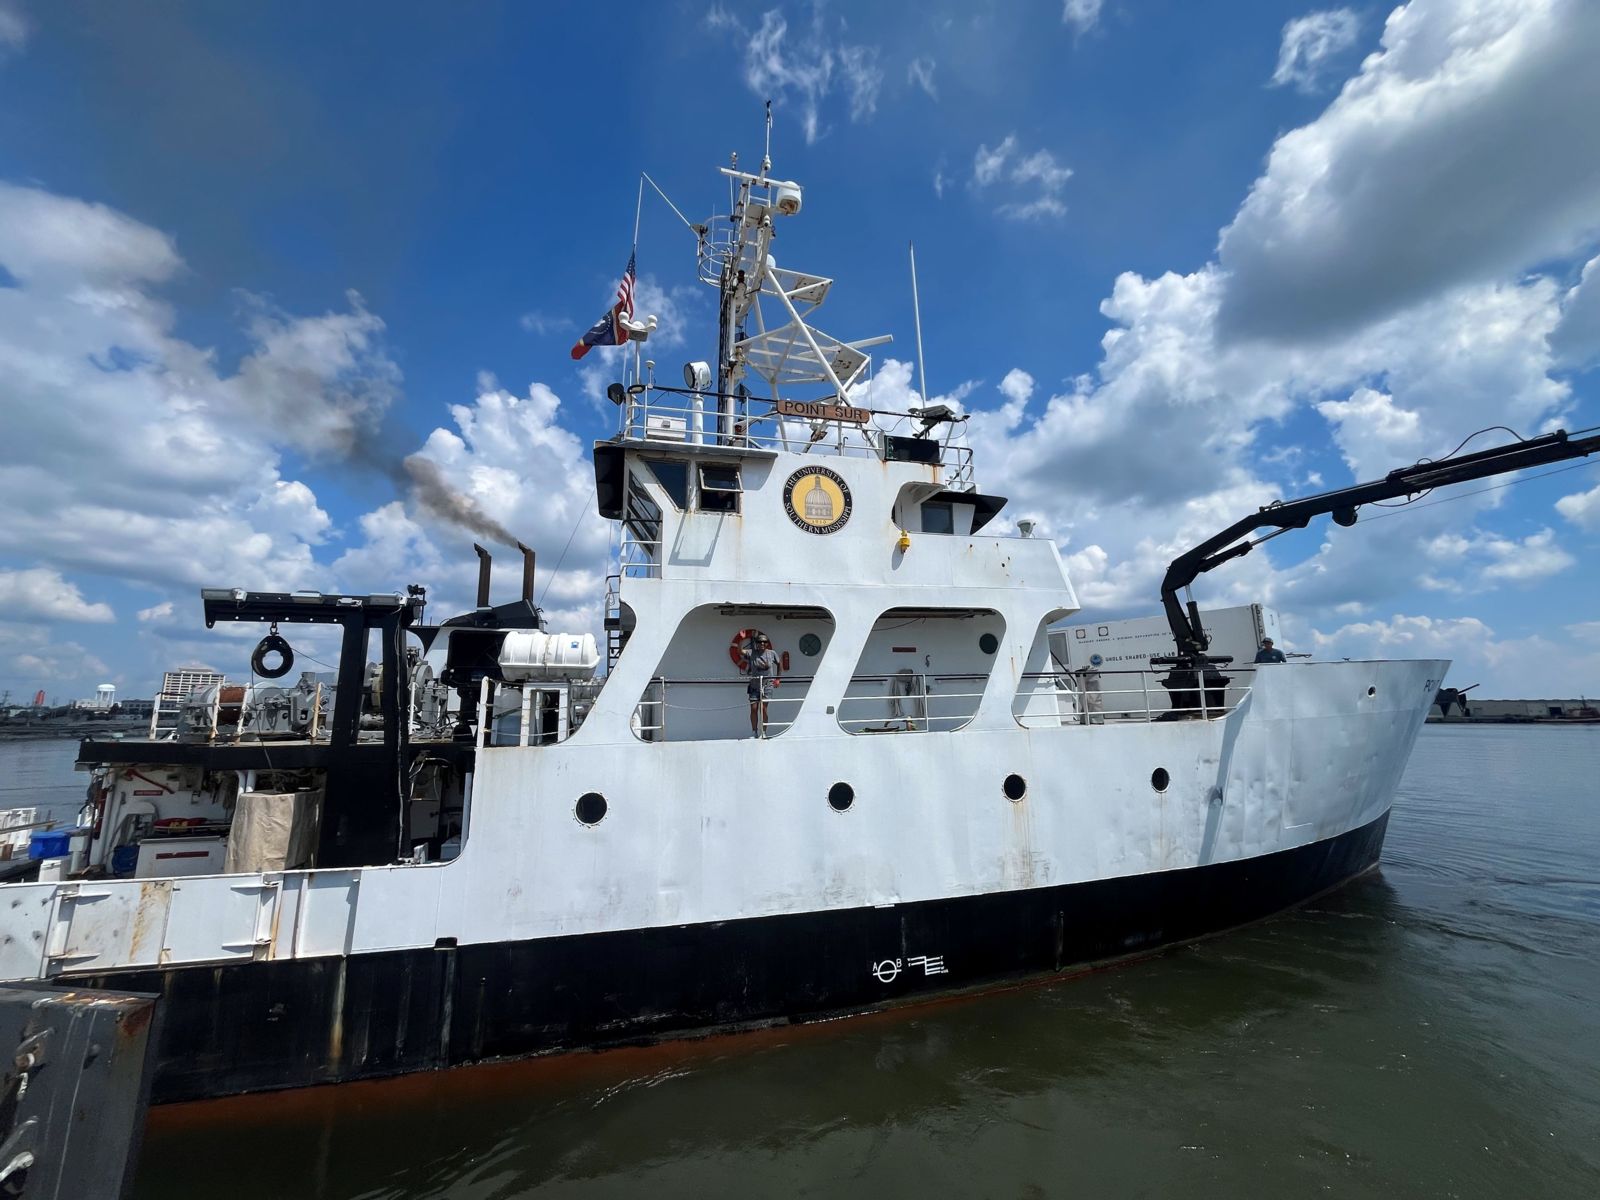
Ahh, what a lovely sight- I finally get to join the boat from a pier this time! My previous two journeys started with a smallboat ride and a sketchy climb up the Jacob’s ladder. This is the R/V Point Sur. Though I have not sailed on this ship before, I am all too familiar with it. The R/V Cape Hatteras, the ship I sailed on for my education, is an exact copy of the Point Sur; sister ships! It feels familiar and foreign all at once.
Work had already begun by the time I arrived. The crew was set about fabricating some metal mounting gear for the equipment that the scientists had brought on board. Crew member Todd will be wielding an oxyacetylene torch, ready for action!
The night is always young onboard a ship. As many people went off ship for dinner, I stayed behind to get settled in properly. No later than everyone left, an engine room alarm began blaring! I found this light blinking red, and sent a message out to the responsible parties. All was well, but you have to stay on your toes at all times! There is truly no telling when things can go downhill.
This cruise is focused on ROV operations. The remotely operated vehicle (ROV) will be sent to the seafloor, to collect samples and take a look around the area. Deep sea corals are the main focus for their research!
On the deck, you can see the configuration of their gear; Left is the ROV, which is attached to the yellow tether line. On the right, you have a weight package that is sent to the bottom to help control and sense the ROV. All three of these pieces are deployed together and work in tandem to complete the dive!
Our last night in port gave us a lovely sunset as we made our final preparations for sailing out to sea. We set our ‘sails’ out at exactly midnight, for a somber march out of the bay. Leaving behind the glow of the city for the inky black of the open ocean. It’s good to be back out at sea.
No time for poetry, you have a steaming plate of cable spaghetti to deal with! As an older ship, there are many bygone years of outdated technology being replaced. In the process of revitalizing the equipment, some cables get… let’s just say left behind! We installed some new monitors on the bridge for the captain to keep tabs on the ship, which meant running HDMI cables to each one of them. Many hours spent detangling, and the monitors are up and running perfectly.
Another facet of science on this trip is EDNA. Using the fancy gizmos and gadgets you see attached to our CTD, the scientists can extract environmental DNA from the water. Meaning, they can tell what critters went through the water! They can compare this data with ROV footage.
Speaking of ROV footage! Once the ROV was deployed and settled on the bottom, the real work began. Many eyes spent many hours watching the continuous stream of video. An incredible sight to behold! On it’s first descent to the seafloor, around 500 meters down, we landed right near this handsome fella- I have roughly identified it as a Gulf Hake, or Urophycis cirrata. I am by no means a biologist, but that is my semi-educated guess!
The ROV had just lighted onto the seafloor, when the operators noticed something was amiss. The systems weren’t operating as they should, and the team made the executive decision to recover immediately. Unfortunately, their suspicion was well met. A connection point on one of the attached components failed, meaning it completely flooded with water. This melted all of the components and wiring on the inside, which is something that is not repairable at sea.
After a few brainstorming sessions, adjustments to the ROV, and more than a couple prayers, the team found a temporary solution. The ROV was set up excluding the flooded components, which makes it usable but with greatly reduced function. Though it is less than ideal, it does at least mean the cruise can continue rather than heading back to port immediately.
On the second dive, the ROV was able to collect a few small coral samples and bring them back to the surface. The ‘arm’ you see pictured has an apposable hand that can be controlled from the ship, and a little container to drop samples into.
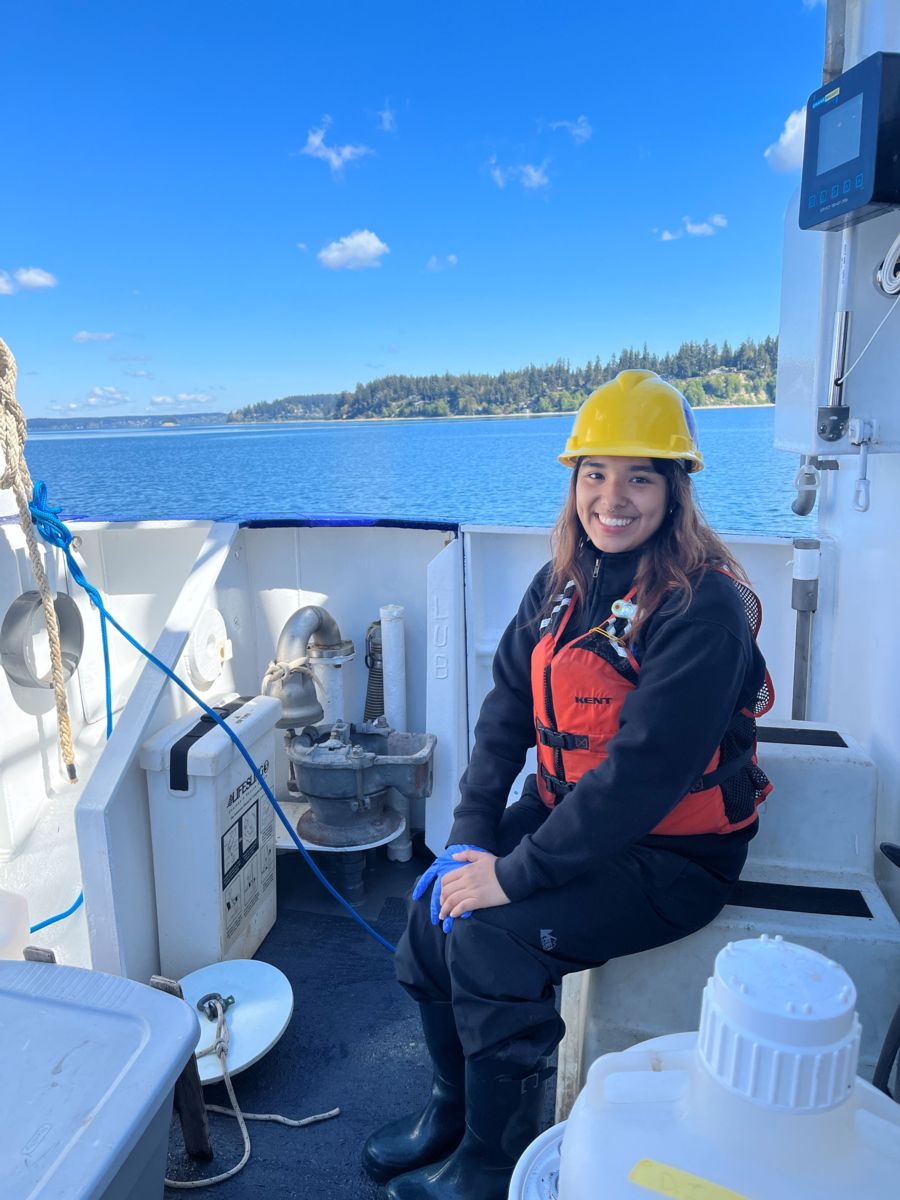
My mentor for this trip, Grace, instructed me during the first few CTD casts, and trusted me to operate the computer for the next one! Though I may have forgotten to take off my hardhat, we successfully recovered another batch of water samples. The water we bring up will be used for sampling and for storing the live coral recovered with the ROV.
During this cast, we found that bottle #9 did not close at all, meaning it came back completely empty. We investigated, and determined the bottle to be operating smoothly. The next step was to ensure that the firing mechanism worked! We disassembled the housing, and found corrosion on the magnet responsible for releasing the lid of bottle nine. A quick scrape removed the corroded material, and a deck test proved that the issue was solved. Huzzah! If only every problem was so simple…
Yikes… This is the interior of the flooded compartment from the ROV. As it turns out, delicate electronics don’t like saltwater! This not so simple problem could not be solved while offshore, as the parts and personnel necessary are simply not on board. A integral part of working at sea is repairing what you can, and working around what you can’t!
Even with some non functioning parts, the ROV process is still well underway. After each deployment and recovery, the science team jumps into action. They remove the sample compartments from the ROV housing as quickly as possible, as coral is extremely sensitive to temperature fluctuations, and they want their samples live. Once they are inside, they separate the samples into individual holding spaces, full of fresh seawater saved from the most recent CTD cast. These tubs go directly into a refrigerator, where the temperature is set to the same as their natural environment. It’s cold in the deep sea! This gives the animals the best possible chance at survival for testing and studying.
Oh hey, I know her! During ROV operations, my job has been between operating the A frame, and adding tension to the winch wire (pictured). This ensures the wire spools correctly, and makes every elses lives a bit easier. Well, my first week on the Point Sur has been busy and very exciting! I’ll be out here getting grease everywhere and pulling the line tight, while the scientists decipher hours of ROV footage; I know you’re jealous, but fear not! There is to be a public broadcast from the ROV team. Please join us to see some of the action live!
Hello Readers! This past week has been awesome learning new things but pretty intense with back-to-back deck operations.
Let’s dive in 🙂
9/16
Today, I practiced my CTD termination! Since we have yet to make a new CTD termination but instead have made a new trawl winch termination, I have been using scrap cable from the CTD to practice with.
So, what is a cable termination? A cable termination is when you are connecting two different cables together so that power can run through the cable to give and receive signal to whatever device you want connected! I have been practicing with a pigtail cable (cable that attaches to the CTD with no end, just cable that has been cut). In order to make a cable termination you must cut through the outer layers of both cables. The CTD cable is made out of two metal layers, an outer and inner layer. I will have to cut through both to reach the inner wire that sends and receives signal.
I first have to cut through the CTD outer layer using a Dremel and make sure it is an even cut so that when I cut the inner layer, it is even for termination. I then cut the inner layer and leave two metal strands alone so that the positive or negative wire from the pigtail cable will be later attached. I then move onto another layer which is a silicone shield, to protect the inner wires from touching and conducting electricity to the outer layer that also sends and receives signal. I strip the silicone shield by using a wire stripper and delicately remove it to reveal the 3 strands that can go to the positive or negative wire. The trickiest part is having to individually strip these three very thin wires without cutting through them! If I do make that mistake, I have to go down further into the cable to try again and if that happens too many times, I might have to start over from the start!! After I carefully strip each wire and sand wire to expose the pretty pink wire, it is time to move onto the pigtail cable!
Revealing the inner wires of the pigtail cable is relatively easier and the same process as stripping the three thin wires. I use a wire stripper to cut through the thick black pigtail cable to reveal the two inner wires and some paper to keep the cable in its circular shape. I use the wire stripper again to strip down these somewhat thin wires and sand them down to reveal the pink wires. I sand down the wires so that the next process is a bit easier for me.
Once everything has been stripped and sanded down, it is time to put the two cables together via soldering! I prepare the soldering material and twist the matching wires together so that soldering is easier. To find out which wires from the CTD cable match the wires from the pigtail cable, you do a continuity test using a multimeter to find out which wire is positive and negative. Once that is figured out, you can then twist the wires together and start soldering!
Before this internship, I was not too experienced with soldering since I did it a few times for a class. However, now that I have practiced a bunch of terminations using solder, I got the hang of it!
Once I soldered the wires together, making sure to cover most of the exposed wire, I then cover it with heat shrink to really secure the new termination I made. Then there are two ways to go after this step to fully secure the termination. There is a resin/silicone inline splice kit method or a hot glue method. Both choices vary on the context of making a termination, whether that be time constraint or quality of termination. The hot glue method is just as good as the resin inline splice method and dries quicker to use the termination ASAP. The resin inline splice method, depending on the manual, takes 24 hours to set but is very sturdy and has a nice mold it can set in. I went ahead and did the hot glue method since I am only practicing and would be very fast to set.
I started hot gluing the new soldered wires together to form a single cable, the same diameter as the CTD winch cable, and made sure it was nice and even. To really secure the hot glue termination, you should hot glue a few inches past the cables so that the hot glue has something to really hold onto. Once that is done, we can now use a bigger heat shrink to finalize and secure the new termination once more!
I use a bigger heat shrink so that the new hot glue can be covered, and that the diameter of the cable is even across the entire termination. This step usually takes a while if I use too big of a heat shrink but, in the end, they all shrink down to a good size and secure the brand-new cable termination I just finished!
9/17
Today, I learned how to process some CTD data to help scientists calibrate their data. To process CTD data, we use a software called Seasave that automatically gathers the data and averages values depending on the parameter. I first had to process all the CTD data which was one file output and then, to help out a scientist who wanted average sound velocity at every meter, I went ahead and processed the output file. To get sound velocity averaged at every meter, I had to bin the data by one (which accounts for every meter), and then press the process button to get the bin file! I then give all the processed and binned files to the scientist who needs it, and his data will be calibrated soon!
This current cruise is about to wrap up as we head to shore now, so in preparation, we turn off the SCS system, flow thru system, ADCP system, and ship track system once we reach Gulfport Bay. Once these systems are shut down, they will usually be saved in their respective folders within the ships network. That means the marine tech has to gather all the individual data from the systems and put them into folders labeled ADCP or SCS that then get added to one major folder with all the cruise data! This single folder with all the science data gathered from the entire cruise is then transferred to a USB which is then given to the Chief Scientist of the cruise!
It is very fun to know where cruise data comes from, how it is manipulated (sometimes), and see it all come together to be given to the Chief Scientist. I have been on the other side of the science where I receive that data and have to do some post processing to get the data I want and need. In my head, it all makes sense where the data comes from, how its saved, why it has to be saved in certain formats, so we the scientists can go crazy with the data!
Later that day when we had some down time, we went over the name of hand tools which I am not too familiar with. The only hand tools I know are a Phillips flat head, screwdriver, and a hammer. Outside of that, everything I learned and mentioned on this blog has been learned on this boat!
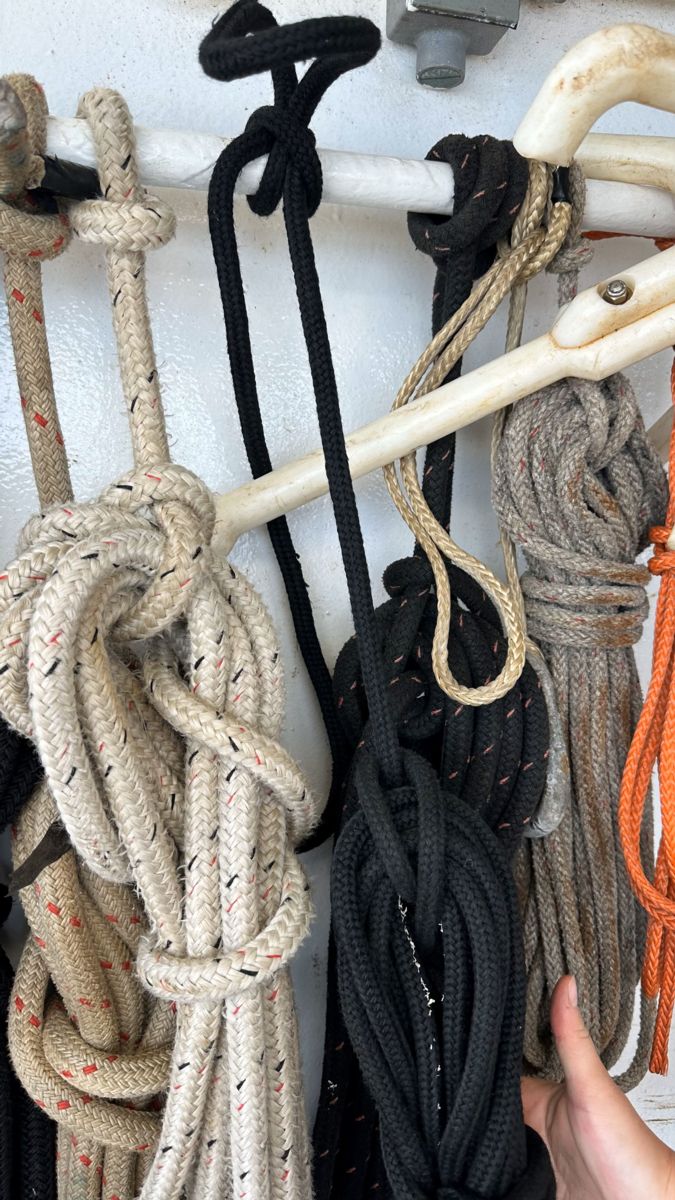
Then to end the day with an activity, I was introduced to hollow braid and how to splice with it! This type of rope is synthetic but braided very meticulously so that when you push against it, it opens up, but if you pull it, it tightens. To splice this rope, you need to use a tool called a fid. The fid looks like a knitting needle with a pointy end on one side and an opening on the other. The opening is for the hollow braid rope to go into to be able to tuck the rope into itself. Grace taught me a trick to cut the end of the rope at an angle and tape it off with electrical tape to be able to effectively insert it into the opening. To really secure it, she says to wrap the area around the fid where the rope is inserted into with more tape. Now that it is taped up, it is ready to splice!
To splice, you need to have enough line to either make an eye splice or an end splice. Usually, the amount of length needed to make a secure length is around ten inches. When beginning a splice, you put the pointy end of the fid into the rope (with enough space) and start pushing the rope into the hollow braid. It will naturally start to open up and go further into the fid. Once you are at or past ten inches then you take the fid out and then take the rope from the fid and pull the rope from both ends. This will make a seamless splice and keep most of the strength of the rope!
9/18 & 9/19
Today we reached shore, and I learned how to shut off the flow thru system! Yesterday I learned how to turn off the systems but now I have to fully shut the flow thru system down so that I can learn how to deep clean it! Lots of algae accumulates in the transmissometer and the TSG (temperature, salinity, and conductivity) so marine techs have to maintain these sensors and clean them every other month!
Cleaning the transmissometer, we use grit soap to clean it first, and then use diluted bleach to wash the grit soap and then rinse it with water to finish it off. The TSG is more delicate and can be cleaned with grit soap but cannot be cleaned with bleach! Then you must rinse the TSG with water and use a scrub to get the grime off. Once everything is clean, you put the sensors back together (which is hard on this ship) and boom, the flow thru system is cleaned!
Next on cleaning is the CTD sensors and Niskin bottles! This CTD cleaning has to happen after every cruise is complete so that the sensors are ready for the following cruise. The products used to clean the CTD are diluted Triton X (a surfactant), diluted bleach, and DI water in that order! I used a big syringe with a tube connected into the CTD sensor in order to pump the chemicals back and forth to get all the accumulated algae and saltwater out. Once I am done cleaning, I leave a bit of DI water in the CTD so that the sensors stay wet and maintain function.
Once that was done, I rinsed the entire rosette with freshwater and made sure to rinse the inside of all the Niskin bottles so that they were all nice and clean. I left the bottles open for them to air dry and once they fully dried, I closed them and finished cleaning the CTD rosette!
9/20
Now that the first cruise is done, the ship crew has to start preparing for the next one! Today we are mobilizing for the next cruise and that means getting our shift schedules in order. Me and Grace agreed that I should have the morning shift from 4am to 4pm, leaving me to be the sole marine technician for around four hours!! This means I have to be in charge of coring operations and CTD casts before Grace is even awake! This made me a bit nervous at first since I have not done a coring cruise before but the mate and deckhand on shift will help me through it all!
Since most of today was scientists getting their equipment on board, Grace went ahead and introduced the Chirp echosounder to me. The Chirp system on board has two settings; 3.5kHz and 12kHz. The 3.5 kHz is used to make a 2D profile of the seafloor and also display subfloor layers, which can tell scientists what type of rock it is. This, however, comes at a cost on the ship since the Chirp sends loud signals and at a fast rhythm depending on the depth, which might disturb sleep for people. The 12kHz on the other hand is much quieter and can give a profile of the seafloor but cannot display any subfloor layering. So, scientists may want to use one setting over the other depending on their needs. On this mud cruise, the PI wants to use the 3.5kHz to create a seafloor profile in order to see what type of rock is beneath the seafloor.
9/21
This morning was my first shift alone as the marine technician! It was a really rough start but, in the end, everything worked out how it was supposed to! Coring operations with the Mega core require someone to control the A-frame, the .680 winch, and the ship. The way things worked out this morning was that the deckhand controlled the A-frame, I controlled the winch, and the mate controlled the boat (to keep it on station). I was not expecting to control the winch, let alone do it on my first coring operation, but I did it anyway and learned on the spot.
When it comes to controlling the .680 winch, you have to keep in mind how the A-frame moves. If the A-frame moves out, the package the winch is connected to will start lifting up because the winch cable is getting shorter. If the A-frame moves in, the package will start to move down as the winch cable is getting longer.
With this operation, we have to lift up the Mega core above the ground so that the co-PI can switch a pin from one hole to another that allows the Mega core to capture mud samples when it hits the seafloor.
Then we can fully A-frame out and that will lift the Mega core up and that is when the winch operator must pay out (give more line) so that it can smoothly go horizontally outwards. Once the A-frame is fully extended out, the winch operator can begin to fully pay out at a certain speed before sending the Mega core down automatically.
I was the one controlling the winch during the first coring operation and that was a bit rough. I could not quite grasp the idea of the A-frame moving and influencing the winch cable at first so when it came to lifting the Mega core before deploying it and recovering it, I was scared that I was going to squish someone’s toes! Despite my nervousness, I was able to safely deploy it and get it back on deck, and even got 11 cores out of 12! This was important since the twelfth core had not been working for months and 11 cores means all samples were collected as much they could!
9/23
This morning was busy with coring operations back-to-back. The first coring operation was a pleasant success as twelfth core on the Mega core somehow worked (which had not worked since early this year) and almost got all coring samples! The science team was so excited to see that specific core get something and made me happier that all the deck operations and winch operations were worth it even for this small moment.
Since the science party wants to start coring operations at 4am when my shift starts, that means I do half of the coring and CTD operations on deck. Sometimes I go ahead and do them all because I really want to experience the true work life of the sole marine technician on board. I, of course, am never alone as Grace always has my back and the crew are always there to support me.
Since joining this ship, I have gotten a bit shy around the new science party that joins, and I was really curious as to what this science party were looking. All I knew before they joined is that they are sampling in the Deep-Water Horizon oil spill region. I got the courage to ask them about their science project and they were very kind and open to explaining the whole reason why! The main science group that processes the mud core samples is looking at the biological samples from this sediment, whether it be microscopic or macroscopic, and seeing how the Deep-Water Horizon oil spill has impacted the species in the area. I saw that they were slicing the cores in specific lengths and I asked about that and the Chief Scientist/PI of the lab explained that when science groups first did coring samples of this region, they all sliced the cores at different lengths, and they are attempting to match each study with different lengths. That way they can compare the samples with all the different studies in a somewhat standardized way! I asked another group what they are doing here, and they want to use water samples to filter for eDNA and POM (particulate organic matter).
We ended all deck operations successfully and headed back to shore a day early since a new tropical storm (turned into Hurricane Helene) was forming and creating high wave height by tomorrow, so we want to avoid it as much as possible.
This mud cruise was super hard yet super fun! See you all next week!
Hello Readers! So far on this current cruise, everything has gone great and as I am writing this, we are heading back to port a day early!
But I have to catch you all up to what I have been doing this past week!
My fifth day during this internship was learning quite a few different subjects. I learned more about COAX connections, rope tying, and figuring out a plan to troubleshoot the transmissometer. We did this during transect lines as the transducer needed data, which meant free range on our activities. The first part of the morning we tested the primary antennas and looked at the COAX connections to make sure nothing was corroded. Our tests of connecting and disconnecting cables helped pinpoint which antenna was the culprit and it turned out the side antenna (since there are 3 in a triangle formation) was not working properly. We made a rough plan of what to do the following few days since a scientist on board needs continuous GPS data and had to hold off on that.
After this event, I went over my rope tying knots, solidified my definition of hitches, and learned a cleat hitch! It will be pretty handy for me when I work more out on the deck when it comes to our next research cruise, a mud cruise as they call it! Basically, we will be taking core samples from the bottom of the seafloor and will be using my cleat hitch skills and tag line skills to help maneuver the coring device, MC-800 Multi-corer Deep Ocean Sediment Sampler, as steady as possible.
We also troubleshooted the transmissometer and had to wait and see if it was fixed in the following few days because we would be arriving to Pensacola port to avoid the wrath of Hurricane Francine! The seas were beginning to get pretty rough, so we made it out of the Gulf of Mexico right on time!
The following day, Grace showed me how to shut down all sampling systems since we would be arriving at port soon and got the okay from the PI. She explained that we have to shut down the systems to avoid sediment from clogging the flow-thru system (since water gets shallow) and the ADCP data at port is irrelevant to the science party. While she showed me how to shut down the systems, she also explained to me what types of data streams through specific software like Seasave and SCS. That also means we have to disassemble and secure the huge transducer pole before going into port. We did just that with a bit of a hiccup, but everything was secure before we moved up into port.
The rest of the day was spent troubleshooting minor issues and once our shift was finished, we hit the town and got to know downtown Pensacola!
On our seventh day, I practiced my rope knots and seemed to forget a few of them. Grace made me do them all until I had them down and that helped me a lot to really drill it into my brain.
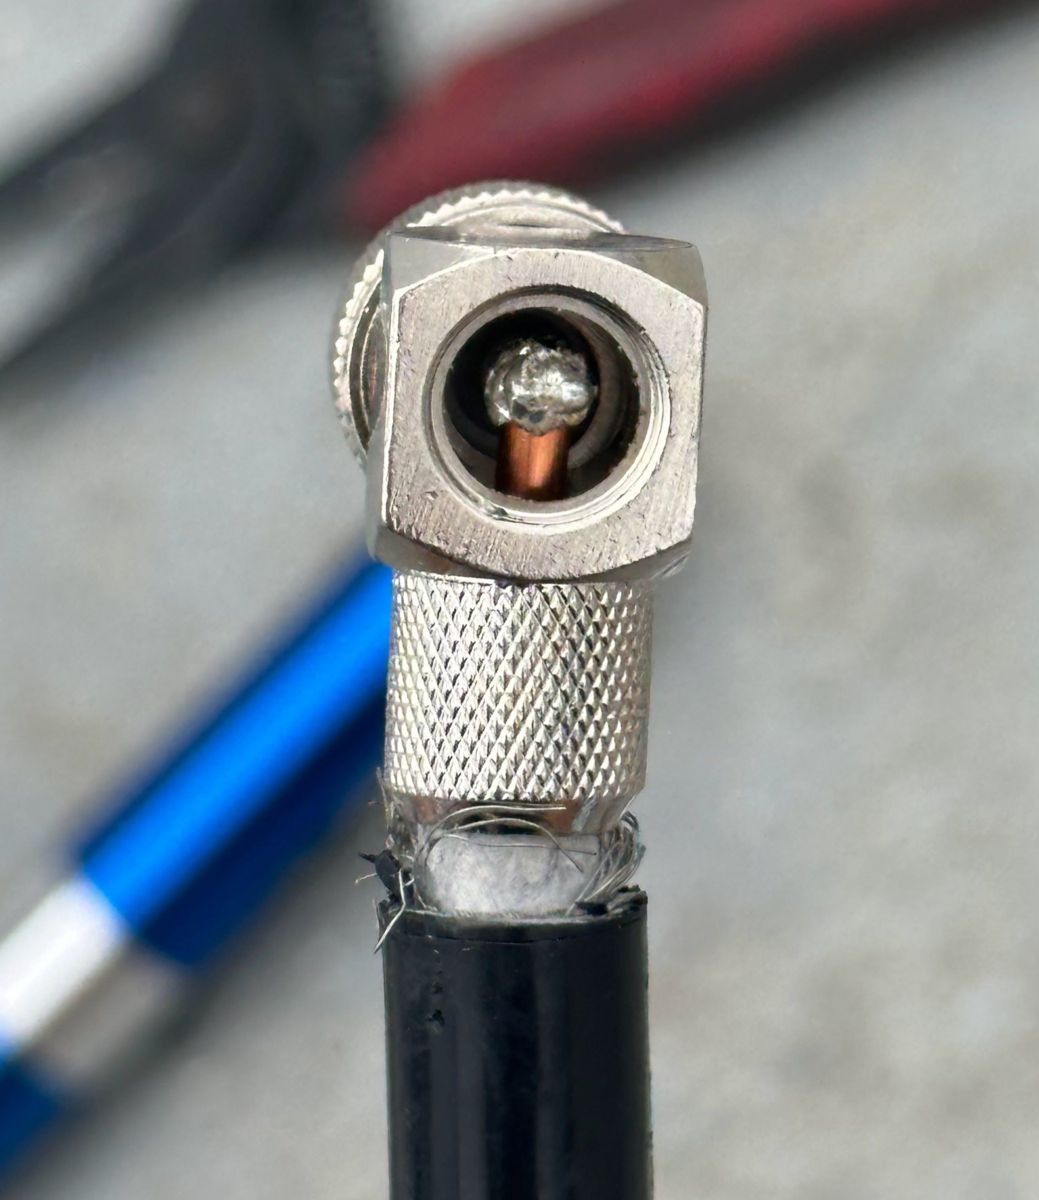
Since we were at port and there was clear weather out for a bit, we decided that it would be a good day to create a new cable termination for the suspected antenna. We cut into the antenna and noticed that the inside was completely corroded so we kept cutting until everything looked good and started the termination from there. We used an elbow COAX to start the termination and had to figure out how to solder the very middle inner piece to the COAX connection. After 2 attempts, we figured out how to solder the cable and COAX together and went downstairs to see if the connection works. We saw that the connection worked but that the heading issue was not fixed, and the other antenna was starting to have an issue, so we replaced it with a backup antenna, which seemed to fix the position issues. As for the heading issues, we contacted the team responsible for the software and waited for a response.
Then once our shift ended, we headed into downtown Pensacola one last night before leaving the following morning!
On my eighth day, we started things off slow since we had to secure the transducer pole back on deck before going out to our first station. We couldn’t start our sampling systems until we were out of the bay to avoid irrelevant data and clogging our flow-thru.
In the meantime, we got a response from the team responsible for the GPS software and saw that heading was back up and working!! The heading issue was happening the entire time I have been on the Pt. Sur so having this issue resolved after many troubleshooting attempts was super satisfying and a check off our long to due list.
During the downtime between leaving the bay and reaching our first station, I learned how to start the sampling systems for the ADCP, SCS, flow-thru, and Wi-Fi. There is a bit of a learning curve to understand how to turn on the ADCP and SCS system but with Grace’s help I was able to do it!
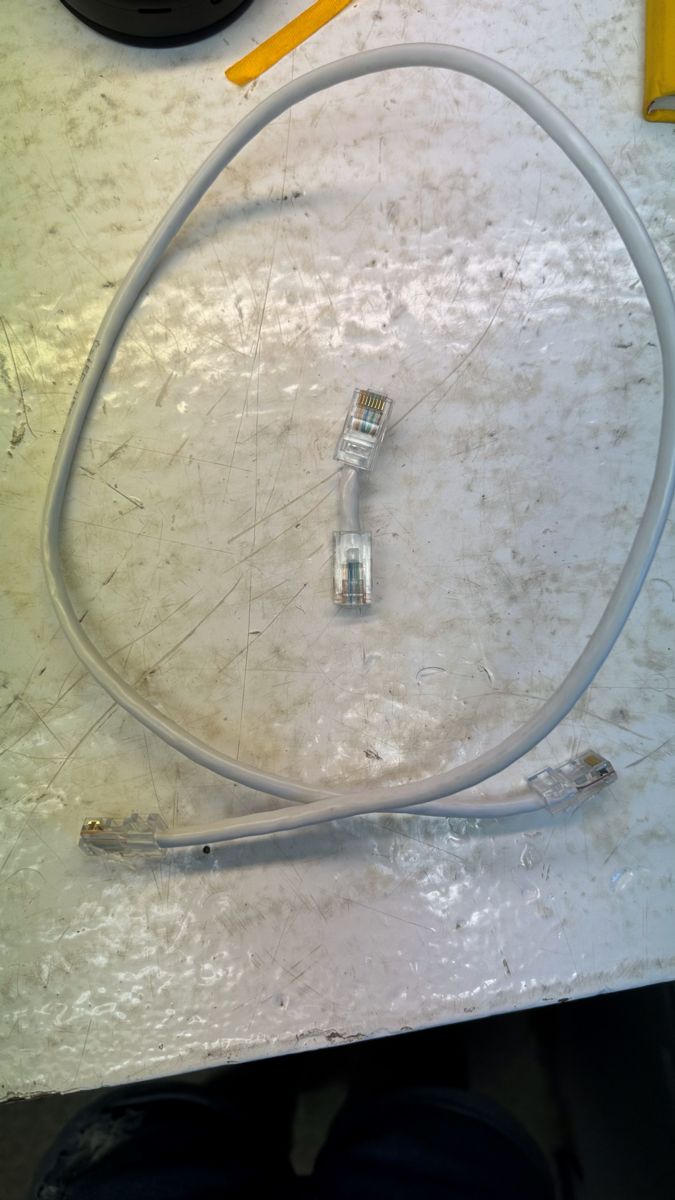
Once that was done, I learned how to make ethernet cables which was super fun to me because I have always seen and used them but never knew you could make some yourself! Grace taught me how to make them and how to test the connectivity and realized just how fun it is. I made a few throughout the day with some down time and slowly got better at it!
I also learned how to splice rope, specifically manila rope! Manila is made out of hemp and is pretty rough to work with but if rope falls off the boat, its biodegradable. However, since it is biodegradable, if it gets saltwater on it, it will degrade much faster compared to other materials of rope. The different splicing techniques I learned are back splice, end to end splice, and eye splice. I also learned how to do whipping knots to secure the base and end of my ropes, to make sure its super secure.
On my ninth day, we continued troubleshooting the transmissometer by replacing the ports with the transmissometer and PAR sensor. We originally were using a y-cable so that the fluorometer and transmissometer were sharing a single port but, to rule out any issues in case the pins on the CTD were the issue, I switched the ports with the PAR sensor. This meant that I used a y-cable to share the PAR sensor and transmissometer on the PAR port, meaning the fluorometer will get its own cable and port.
After I was done switching cables, Grace taught me how to splice rope with synthetic material! Synthetic rope doesn’t degrade as easily as organic material, but it frays easily. Working with this type of rope was hard to tuck in on itself but I was eventually able to complete the splice knots.
Grace also taught me a new special knot called a shrimpers bag knot! Basically, when you make an overhand knot around a bag and make continuous repetitive knots that make a long-braided line, you yank it to catch whatever you want (called shrimpers bag for a reason). It was relatively easy to tie and convenient for various reasons.
Later in the afternoon, Grace requested two ethernet cables from me since she has had issues connecting her computer system to the ADCP monitor, so I went to work! When it comes to troubleshooting, Grace likes to replace cables or create new cable terminations for them first before moving onto the deck box or device and then eventually the software, that way it’s easier and less complex to figure out the issue. I quickly made her two ethernet cables and replaced them on the ADCP deck box and she tried testing it, but nothing changed. I tested the ethernet cables for connectivity earlier and they were working perfectly fine, so we know it is not the cable that is the issue. She thinks it might be a software issue, but it isn’t too much of an problem at the moment.
The following morning, we continued to troubleshoot the transmissometer and decided that we would switch the instrument with another one we had on previously just to see what would happen. We were aware that the previous transmissometer was giving just as bad data as the current one, but we thought that the cable and port switch might do the trick for the previous one. I went ahead and switched the transmissometers and calibrated it and made a new configuration file for it! I did this all on my own and was surprised by myself at how quickly I grasped things on the software side of the CTD instruments!
Later that afternoon, Grace instructed me to take a look at the backup GPSs (BX982) and see how the connections are looking like. I went up above the wheelhouse to take a look at the cables and saw that there was some corrosion beginning to form on the inside of the COAX cables and a lot of corrosion on the outside of the antenna. To troubleshoot, Grace said I should just clean the inside of the COAX cable and the outside of antenna with electronic cleaning liquid. After cleaning the cables and antenna, we tested to see if the backup GPSs were giving heading and position now but there were still errors. The next best thing would be to make new COAX cable terminations for the backup antennas, and we waited until after lunch to do so!
After lunch, Grace gave me the opportunity to do the cable stripping, termination, and soldering all on my own, which I was a bit hesitant to take on but did so anyway. How else am I supposed to learn if I don’t make mistakes and improve from there? I got all the supplies I needed to make new COAX terminations and went up to fix the GPSs. I went straight to stripping wire and found a lot of corrosion inside both of the cables. Later, Grace joined me and looked inside the old COAX connection I had already cut off and she found huge amounts of corrosion inside the connection which was our culprit in our errors. Once I was done stripping both cables, I went to solder the COAX elbow connection and cable connection conductor together, which in all honesty, was the most intimidating part of it all and took me a while so I can avoid big mistakes. I didn’t solder a good connection at first but after a few tries I eventually got the two pieces soldered together and used heat shrink to really secure the cable and COAX cable together. We finally put the cable back into the antenna and tested to see if it was working, and it was! The best part is that after a few hours, for the GPSs to reconfigure on their own, they finally got position and heading on our feed! YAY! We fixed all the GPSs onboard right on time before our upcoming mud cruise!
It was another intense but successful week of troubleshooting, learning, and practicing patience. See you all next week!
As I write, it is currently day 6 into my MATE internship working with my mentor, the lovely Grace Fulton on the Pt. Sur, and let me tell you… I have been learning A LOT!
On my first day aboard the Pt. Sur, I had just flown in from Seattle that evening and met some of the crew and had dinner with Grace before heading to bed early. We went to bed early since we would begin mobilizing and working at 6 AM sharp the next day! We woke up nice and early to bring in the CTD, rollers, and tugger winch block, using the J-frame crane to bring them onto the deck. The CTD just came back from getting repaired, so Grace craned that and the tugger winch block onto the deck. I carried the rollers aboard, and man were they heavy! The rollers and the tugger winch block will be used for the DEEPEND project which uses a MOCNESS net.
The project uses a MOCNESS (Multiple Opening and Closing Net Environmental Sensing System) net that carries long big nets that are triggered on the boat so the net can be released any depth and time to capture whatever biology is in the water! This net takes up the entire deck and takes a team to deploy it and bring it back up.
I spent the rest of the day learning so many cool things! Me and Grace set up the CTD with various sensors, including me learning how to correctly identify ports and connect cables to the CTD so that the sensors can use the conductivity, salinity, and temperature parameters to work!
I was able to learn how to create a cable termination needed for the MOCNESS net winch to work and that included me learning how to use a rotary cutting machine to cut through many layers of metal cable. Cutting through that cable was hard since it was my first time and it honestly intimidated me but after many mistakes and redoing it, I got the hang of it. I then had to solder the winch cable and the cable a co-PI wanted to connect to the MOCNESS net and then used heat shrink to protect the new connection. To finish it off, I learned how to make a silicone mold of the terminator to fully protect the entire process I spent drilling off wire, soldering, and heat shrinking. Once that was nice and dry, we tested the connection, and it works perfectly!
On my second day we woke for our 6am-6pm shift and noticed that the flow-thru system was having trouble connecting to the computer in the technician lab, so we went to check out the flow-thru system and found that the power supply for the system was disconnected so there was zero power going to it. We plugged it back in and the problem resolved, PHEW!
Soon after, we went out on the deck to put the transducer pole in the water, and I went to unchain the pole from the side of the boat when my helmet fell off and it went under the boat. I learned my lesson and now tighten my helmet as hard as I can.
When we left the port, we began to have issues with the backup GPS system used to help with navigation and other instruments that needed it. The main issue with the GPS is the heading, what direction the front of the boat is pointing towards. We troubleshooted by resetting the system, but it did not work, so we started investigating the software and found that the GPS was on but not able to recognize satellites and therefore where forward was. We went ahead and emailed a person who created the software for the GPS and found that the issue could be with the cable, connection, or antenna. Troubleshooting for this issue has been hard, however the solution as of right now is using the gyrocompass which only gives heading direction!
I also got to control different frames on deck! I got to use the A-frame which helps take out heavy equipment/instruments off the stern and I got to use it every time the MOCNESS net needs to deploy. Along with that, I got to use the J-frame which helps get the CTD on and off the starboard side of the ship! It’s simpler than I thought although it’s absolutely heavy and huge and I’m so happy I get the opportunity to handle these types of machinery!
On my third day on the ship, I got to learn how to tie the basic knots and a bunch of other useful knots I will be using a lot more on the next cruise. I finally solidified my bowline knot, and learned how to do different bowlines, different hitches, and a few knots! I have been practicing my knots every day and seem to get better at them the more I practice.
I also learned how to read and make hand signal while a crane is operating. For example, if I want the person operating the crane to move the crane up, I point my index finger up and make a circle motion to signal up. Along with the signals themselves, I have also learned to associate the terms with them like knuckling and boom up which I have a bit of trouble remembering, but with enough practice I’ll be set.
I also got my practice with Seasave, the software used for running, saving, and manipulating the data for the CTD. It was a bit daunting for me but having Grace guide me in every step of the way while I learned was super helpful and I can now say I am familiar and able to conduct a CTD cast on my own! I now know how to rerun previous CTD casts, for example, to note if our transmissometer is still malfunctioning and see which data is useful and which isn’t.
After that, things started to slow down as the boat was drifting since we deployed the MOCNESS net and that’s when I got the rundown of the Wi-Fi. The Wi-Fi on this ship is using Starlink and has a limit of 1TB every month. They had just upgraded the Wi-Fi just this year and is capable of fast Wi-Fi. This means that marine technicians have to keep a close eye on the Wi-Fi as they are in charge of it, at least on this research vessel, and have to make sure not to exceed the monthly internet limit. This means me and Grace have to keep watch on our daily limit and warn individual users not to use too much if we do start to notice an excess use of the internet.
On my fourth day, things started off pretty slow! Grace decided that to continue troubleshooting our transmissometer issue, I should replace the entire y-cable it is connected to that also connects to the fluorometer and that then runs to the CTD. I did just that and waited until a CTD cast was needed to test the cable out and the transmissometer was still malfunctioning. We will try to switch the y-cable inputs and see if it is the cable malfunctioning or if it truly is the transmissometer. If that doesn’t work then Grace thinks there is an issue with the pins on the transmissometer, the CTD pins, or the CTD itself. Not sure yet how we will test that, but it would be very rewarding to figure out once and for all what has been causing this issue for the entire cruise!
I learned a couple new knots, a sheet bend and a round turn and two-half hitches! The sheet bend was simple to learn but hard to remember. The round turn and two-half hitches knot were a bit hard for me to learn and harder to remember but after practicing a bunch, I think I can remember it! Grace has been helping me out with memorizing the knot names, tying knots, and their uses by quizzing me randomly throughout the day. I find this immensely helpful as daily practice will solidify my memorization and as she explained, if we are in some sort of emergency, I need to know how to tie certain knots to secure something or attach my line to another object.
Finally, I ended my shift by working the A-frame and J-frame all on my own! This means I got to recover the MOCNESS net using the A-frame all on my own. In my opinion, it was a bit bumpy using the A-frame on my own without guidance, but the recovery went super well! I also got to control the J-frame which moves the CTD in and out of the starboard deck. I got to deploy it using the J-frame which I have practiced a bunch the past few casts, and I got to recover it by grabbing ahold of the entire rosette and everything went smoothly! I’m proud of myself that I can be capable of so much equipment and instruments, and seeing as I have more to learn, I am so excited to see what else I am capable of!
I can’t wait to tell you all what else I will learn! Stay tuned and see you next week!
Hello reader! My name is Kristine Prado-Casillas and I will be interning aboard the R/V Pt. Sur!
I recently graduated from the University of Washington with a Bachelor of Science in Oceanography. During my time at UW I participated in a number of research cruises aboard the R/V Rachel Carson and R/V Thomas G. Thompson. My time out at sea during these cruises introduced me to the field of marine technology, something completely different compared to my lab experiences in academia. Coming back from research cruises, I was itching to find more opportunities to go out to sea and help collect the data necessary for the science within oceanography.
What fascinated me the most about the career as a marine technician was seeing them deal with something new every day. They were constantly learning new things and developing new skills to keep up with the science and techniques to gather data. The ability to constantly learn on the job while working on a boat to support science is what drew me to the field and eventually this opportunity. I cannot wait to work with my mentor to learn skills working out on the deck and to see how much I can grow from this internship!
Outside of my love for the sea, I enjoy hiking, camping, crocheting, making friendship bracelets, playing with my pet birds, and dancing!
August 16th marked my fourth week aboard the R/V Pelican.
We have continued to circumnavigate the Gulf of Mexico to recover and deploy acoustic moorings.
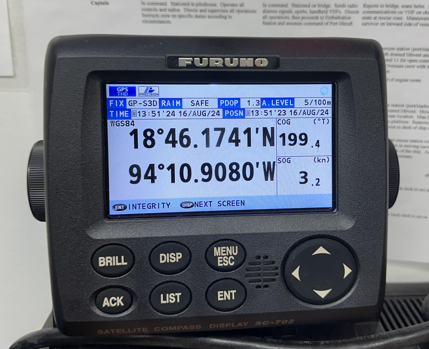
08/16/2024 was the farthest South I have ever been in my life!
This latitude is the closest to the Equator I have ever been! (Hopefully that will change as time goes on!).
There have been many long transits between stations, which has allowed for more time to ask questions and learn lots from both Maggie, my mentor, and the science crew.
Some of the things I have learned this week include:
How to reconfigure accessory instruments on the SBE 9 (CTD) instrument, as well as in the SeaSave software.
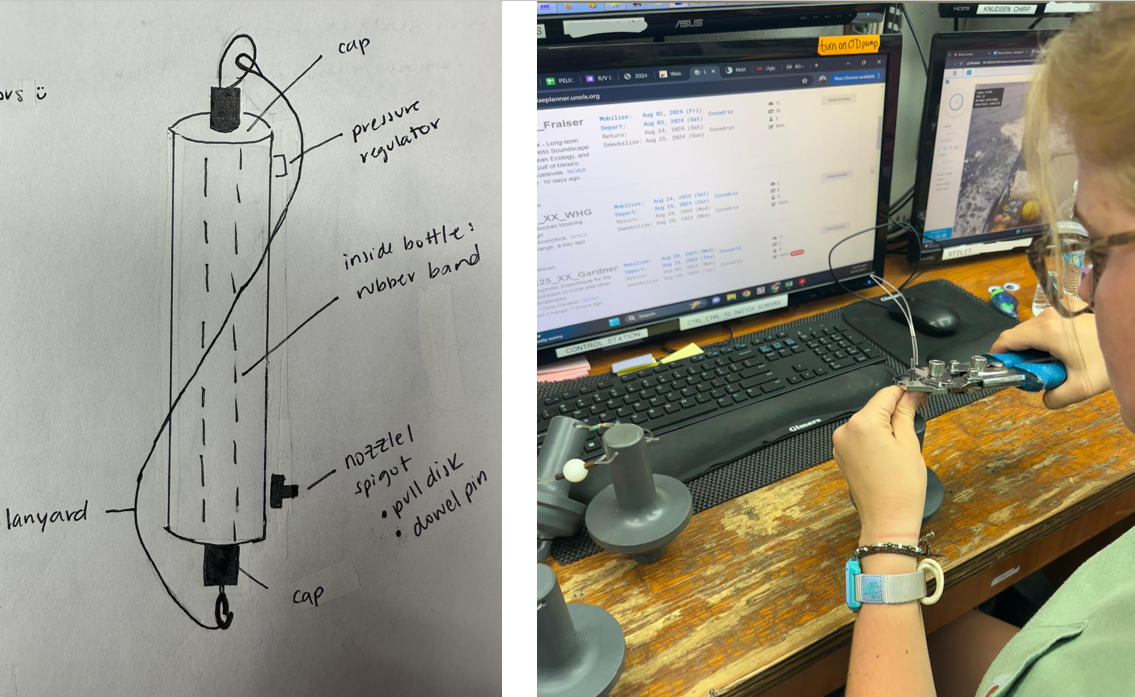
How to repair the lanyard and internal latex band of a Niskin bottle.
How the SBE 911plus CTD works with the SBE 32 and latch head assembly to collect water samples.
How different acoustic release functions are used for mooring recovery and deployment procedures.
How to splice a three-strand line.
How to reconfigure accessory instruments on the SBE 9 (CTD) instrument, as well as in the SeaSave software.
How to repair the lanyard and internal latex band of a Niskin bottle.
How the SBE 911plus CTD works with the SBE 32 and latch head assembly to collect water samples.
How different acoustic release functions are used for mooring recovery and deployment procedures.
How to splice a three-strand line.
An “instrument configuration” is how the sensors, which are measuring different ocean characteristics, are plugged into the SBE 9. The SBE 9 is the CTD instrument that is controlled by a program called SeaSave. (Remember from last week’s blog that this is the case when the CTD Rosette is on a conducting wire).
This instrument configuration has to be defined in a configuration file in Seasave because it tells the program how to process the data stream.
Me switching out a temperature sensor on the CTD Rosette.
In my “Week 1: R/V Pelican (Athena Abrahamsen)” post, I briefly explained how a Niskin bottle can work. I would like to clarify that when I was talking about the “elastic cord” that causes the bottle to close, the correct term for this “elastic cord” is a “lanyard”. The lanyard is an essential component as it is looped around the triggers of the latch head assembly. The latch head assembly will be described in more detail later. 🙂 The internal latex band is what will cause the Niskin bottle to actually close once the lanyard is no longer under tension. It is important to know how to repair these as, if they don’t work, you won’t be able to collect a water sample when needed!
A diagram of the parts of a Niskin bottle, and me adding a crimp to the lanyard attached to a Niskin bottle cap.
The SBE 911plus CTD is the system that includes every component between the CTD instruments and the deck box which connects to the SeaSave software.
The SBE 32 is what executes the command sent through SeaSave to fire specific Niskin bottles to collect water samples. Connected to the SBE 32 is a purely mechanical trigger unit, called a “latch head assembly”. This mechanism uses magnetic pulses sent by the SBE 32 to release the lanyards on the Niskin bottles and cause them to close.
Here are what the SBE 32 and “latch head assembly” look like!
The three-strand line that I practiced a splice on.
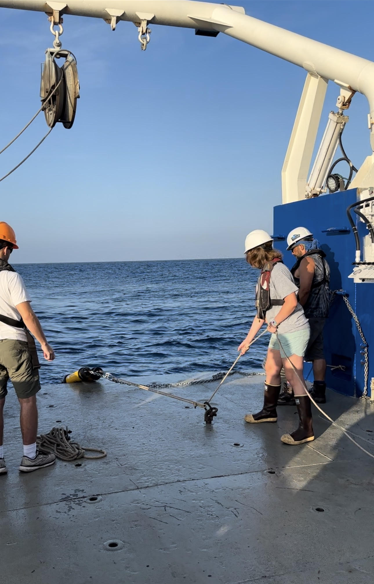
During the recovery and deployment operations, I have begun to help run slip taglines on segments of the moorings. It has been fun to get involved with deck ops!
In this picture I am running a slip tagline.
This science party has also been deploying lagrangian drifters for their colleagues. “Lagrangian” is a frame of reference used for studying the ocean. This frame of reference follows a parcel of water as it moves throughout the ocean. It has been really cool to be hands-on with these drifters as I have learned so much about them in my coursework!
A Lagrangian Drifter that was deployed off the Stern.
Next week will be my last week aboard the R/V Pelican. I am soaking up every moment I can. Talk to you next week! 🙂
August 9th marked my third week aboard the R/V Pelican!
At the beginning of the week, the science party and crew worked to revise the cruise plan in order to avoid Hurricane Debby. We were successful at avoiding the storm while not falling too far behind schedule.
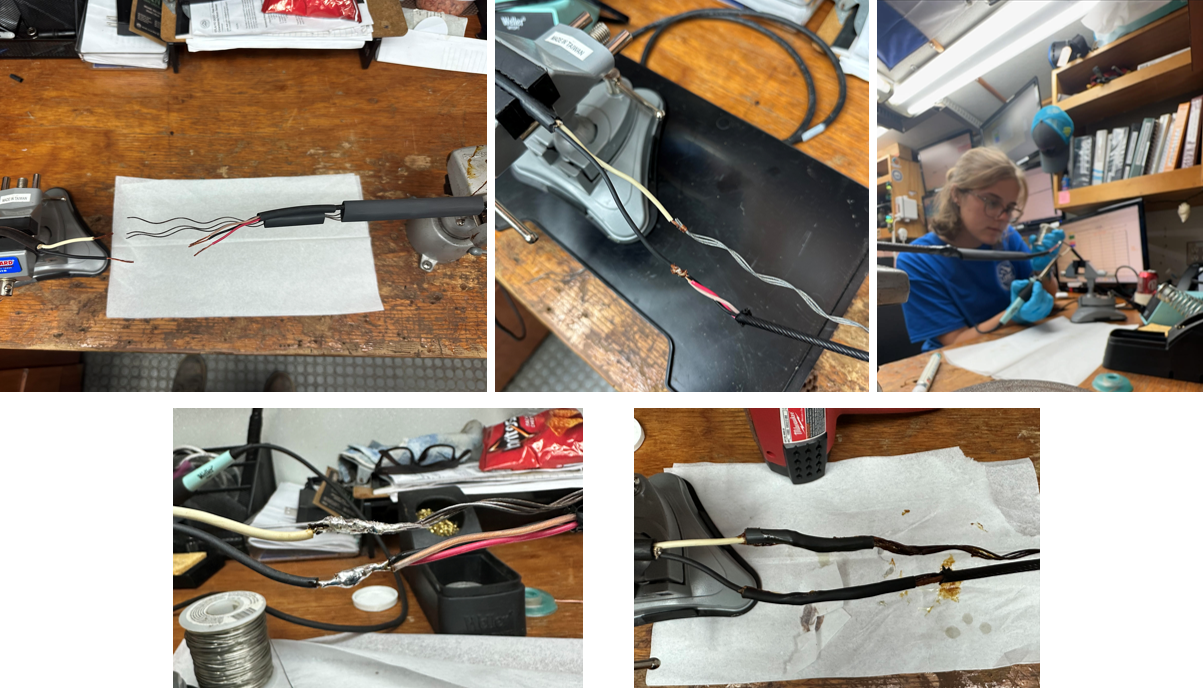
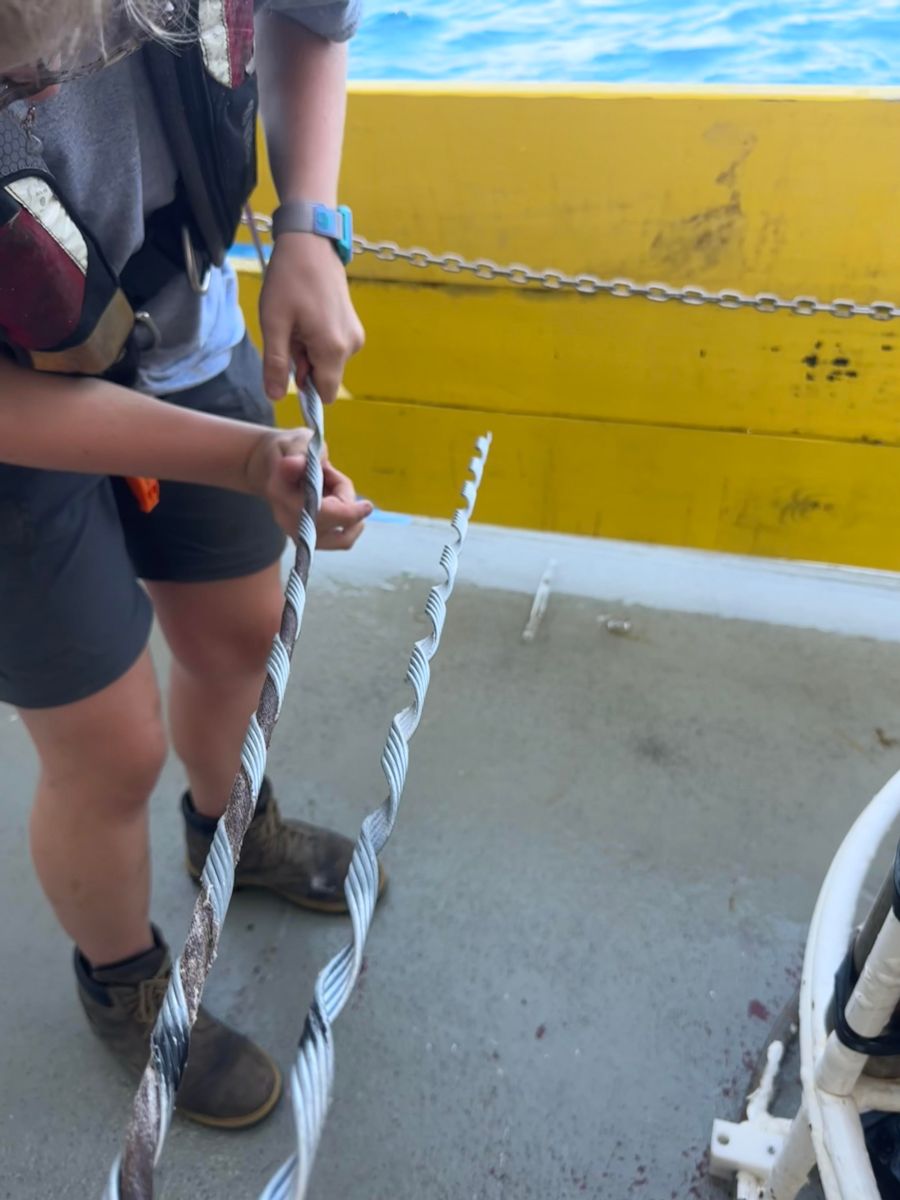
During this period of waiting out the storm, Maggie taught me how to complete a .322 EM wire cable termination.
For those who are not familiar, a CTD Rosette can either be deployed on a non-conducting or conducting cable. A CTD on a non-conducting cable is programmed before it is deployed to fire Niskin bottles at certain depths. A CTD on conducting cable does not have to be pre-programmed as the cable connects the instrument to a software called SeaSave, which is user-controlled in real time.
There are both electrical and mechanical terminations involved in a .322 EM wire cable termination. The electrical termination is the splice (connection) between the CTD’s Seabird Sea Cable to the conducting cable within the wire spooled on the winch (.322 cable). The mechanical termination is the addition of a helical grip to the .322 cable so that the tension on the line is not pulling on the portion of the cable that has the electrical termination.
To complete the electrical termination, the conducting cable within the wire spooled on the winch and CTD Seabird SeaCable are soldered together.
Here are some pictures of steps I had to take in order to electrically terminate the CTD Seabird SeaCable to the .322 cable. (To all of the people reading this who are well-versed in the realm of soldering and wiring, do not fret, I put heat shrink around each of the connections, as well as over both of them. Gotta make sure there are no weak points in the wire!)
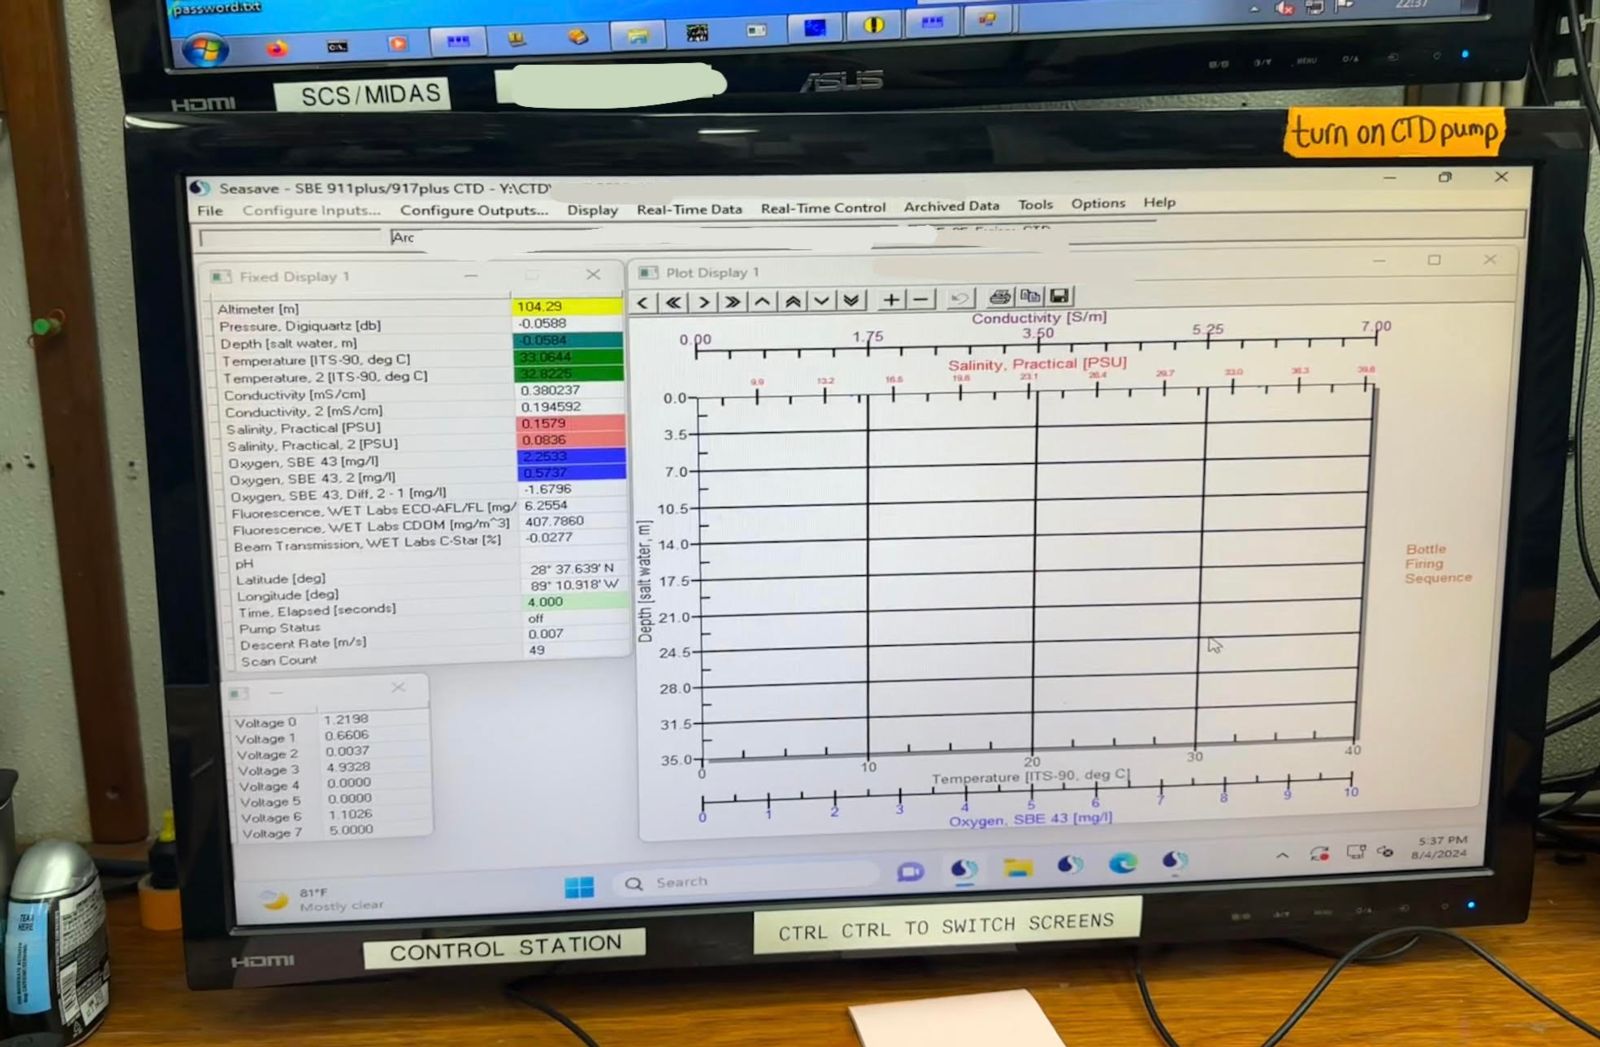
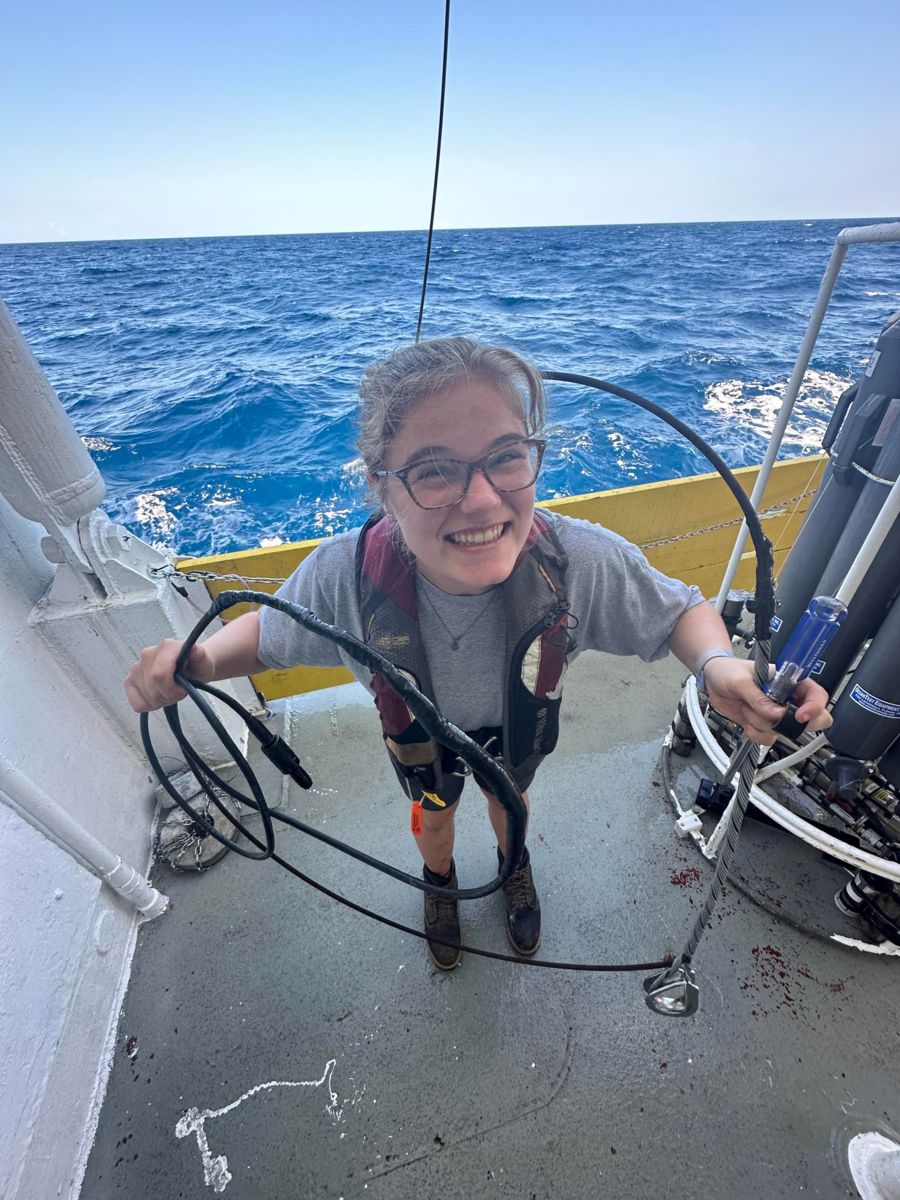
After the connection was made and waterproofed (lots of electrical coating sealant, splicing tape, heat shrink, and electrical tape), we plugged the newly terminated SeaCable into the CTD instrument to see if it was operational.
It worked!
This picture is showing that the electrical termination I completed was successful! We know that it worked as the software was showing real-time data acquisition. You can see this on the left-hand side of the computer monitor pictured.
It was rewarding to see that all of the hard work of completing the electrical termination was successful!
After the electrical termination was completed, we moved on to completing the mechanical termination.
Placing the helical grip on the .322 cable.
This was a super cool process to learn how to complete!
I was very excited to have successfully completed a .322 wire cable termination! Thank you Maggie for teaching me how to do this!
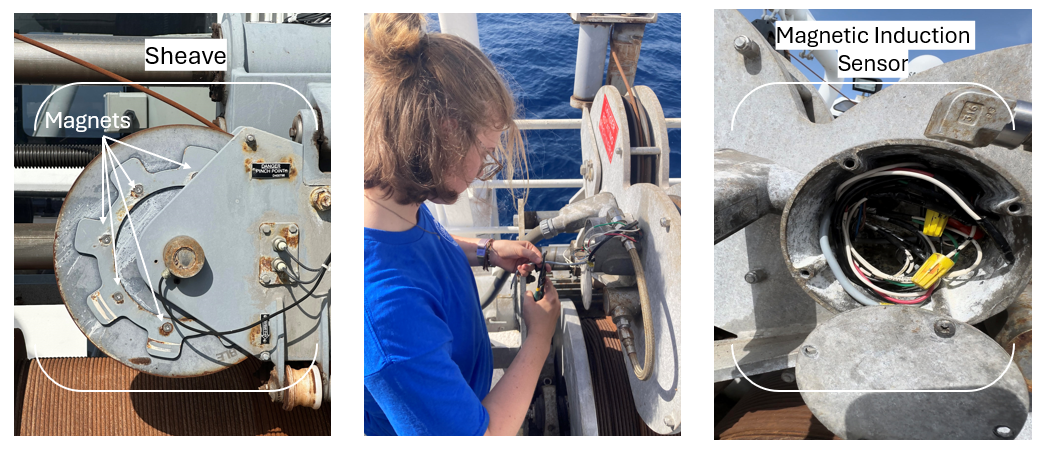
Maggie and I also had to change out the magnetic induction sensor on one of the winches used for deck operations.
That sentence was full of a lot of jargon, I know. Let’s break it down: a winch is a device used to pull in or let out wire. Knowing the amount of wire you need to let in/let out is important, so a sensor that uses the sheave (the piece that keeps the wire in place as the drum rotates) is used to do this. The sheave has magnets, and the magnetic induction sensor picks up these magnets. The distances between the magnets—and how much line is paid out— is known in the program the sensor uses, so it then can calculate and display how much wire has been paid out.
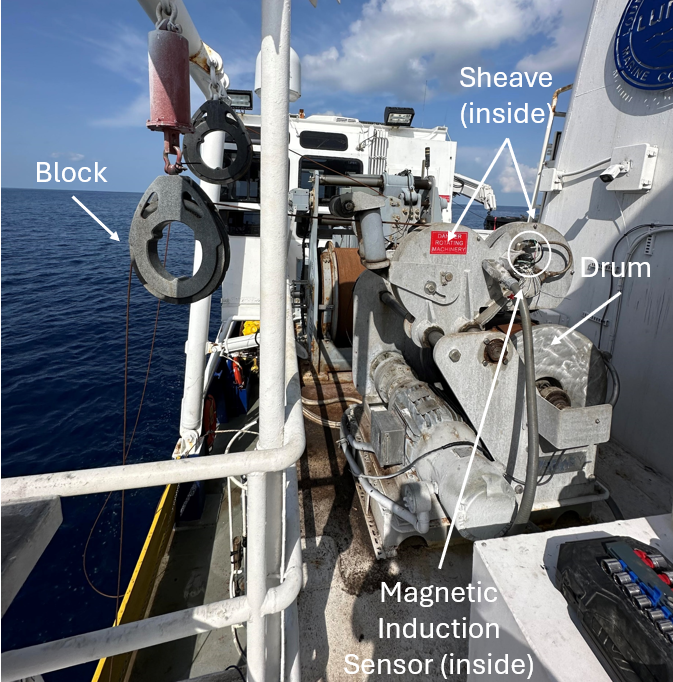
This was a fun project to help complete as it allowed me to practice creating electrical terminations, and familiarize myself with the components of a winch. Below I have an image of the winch that Maggie and I were working on, with the terms I have mentioned previously in this blog (“drum”, “sheave”, and “magnetic induction sensor”), as well as the term “block”. A block is used to redirect the direction of the line, as well as increase the pulling power of the machine.
A quick guide to *some* of the parts of a winch.
From left to right: A close-up image of the sheave, me installing the magnetic induction sensor, the magnetic induction sensor after being installed.
Alongside improving my technical skills, I have enjoyed expanding my understanding of how to safely deploy and recover oceanographic instrumentation– specifically relating to understanding when and where load transfers occur on moorings.
I have also been able to learn more about how to service acoustic releases! I am really appreciative that the science party on board has allowed me to observe and take part in these procedures.
An acoustic release in the process of being serviced.
Some other skills that I have been working on improving have been my knot and hitch knowledge. I also had the opportunity to help the science party splice line segments needed in their mooring designs!
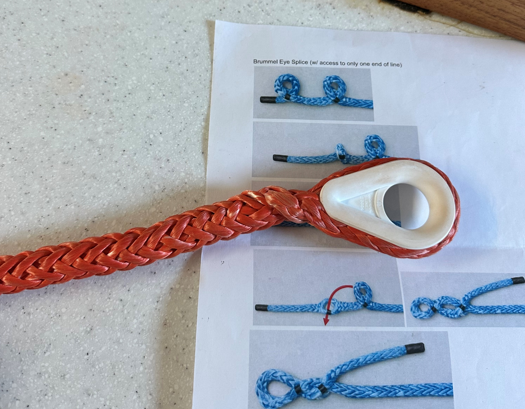
Brummel Eye Splice with a plastic thimble!
It has been a week full of learning, I’m eager to see what next week will entail. 🙂
(p.s., Something unique about this cruise is that we had to have a port stop in order to top off our water supply. The port stop occurred in Key West, Florida, and we were able to get off and explore the immediate surrounding area!)
August 2nd marked my second week aboard the R/V Pelican. This week was quite eventful! We completed the shelf-wide hypoxia survey cruise and demobilized, then we mobilized for the next cruise and set sail! We also got to do something really exciting during the period between the two cruises… but that’s for later. 😉
“Mobilizing” a research vessel relates to the process of preparing the vessel to fulfill the objectives of the research cruise. For example, for this shelf-wide hypoxia survey cruise, a safe boat was needed to complete dive ops (Yes, dive ops! More on that in a little bit!), so we had to load – and subsequently unload at the end of the cruise – a safe boat onto the back deck of the Pelican.
The latter portion of the shelf-wide hypoxia cruise, as I alluded to in the last blog post, involved transiting to stations East of the Mississippi River. It took us about 27 hours to complete this transit! There were 37 more stations that were completed. Again, I was not on shift for all of the stations as operations were occurring at all hours of the day. My shift was from 14:00 to 02:00 for the duration of this cruise. I was involved with the completion of 15 of the 37 stations. The same standard operating procedure (SOP) from the stations West of the Mississippi occurred at this set of stations – a CTD cast was performed, as well as the deployment of a Niskin bottle with an EOX3 Multiparameter Sonde Instrument attached.
In total during this cruise, 138 stations were completed! The time between stations on the transect lines varied between ~30 minutes to ~1 hour, and the time between transect lines was ~2-3 hours. In other words, this cruise felt very quick-paced.
After the Chief Scientist determined that we had surveyed all of the bounds of the hypoxic region, there was time for members of the science party to complete dive operations. The objective of these dive operations was to survey the diversity and abundance of native and invasive species on and surrounding the pilings of uncrewed fixed oil/natural gas platforms. With these surveys, they were interested in seeing if there were differences in the species’ abundance and diversity in the regions above and below the hypoxic threshold (2 milligrams of Oxygen per liter of water).
The “order of events” that occurred to make sure the dive operations happened safely and successfully were:
The science party went through the stations sampled and picked sites based off of their oxygen and turbidity conditions, as well as their proximity to an uncrewed fixed oil/natural gas platform. The oxygen and turbidity conditions were measured using SBE 43 and transmissometer instruments attached to the CTD rosette.
After the stations with the desired criteria were chosen, we started to transit to each of the sites. Once a station was reached, members of both the crew and science party would look at the uncrewed fixed oil/natural gas platform that had been previously selected and decide if it was actually a safe place to dive off of. The safety of the structure was determined based on whether or not the safe boat (the small boat that would be used to motor divers to and from the dive site) would be able to tie off to it.
Once the platform was deemed safe, the science party, myself, and Maggie, my mentor, would check the ADCP data for how strong (and in what direction) currents were throughout the water column. We would also refer to the data that was being collected by the Knudsen Chirp (a type of echosounder) to see how deep the water was at these particular locations.
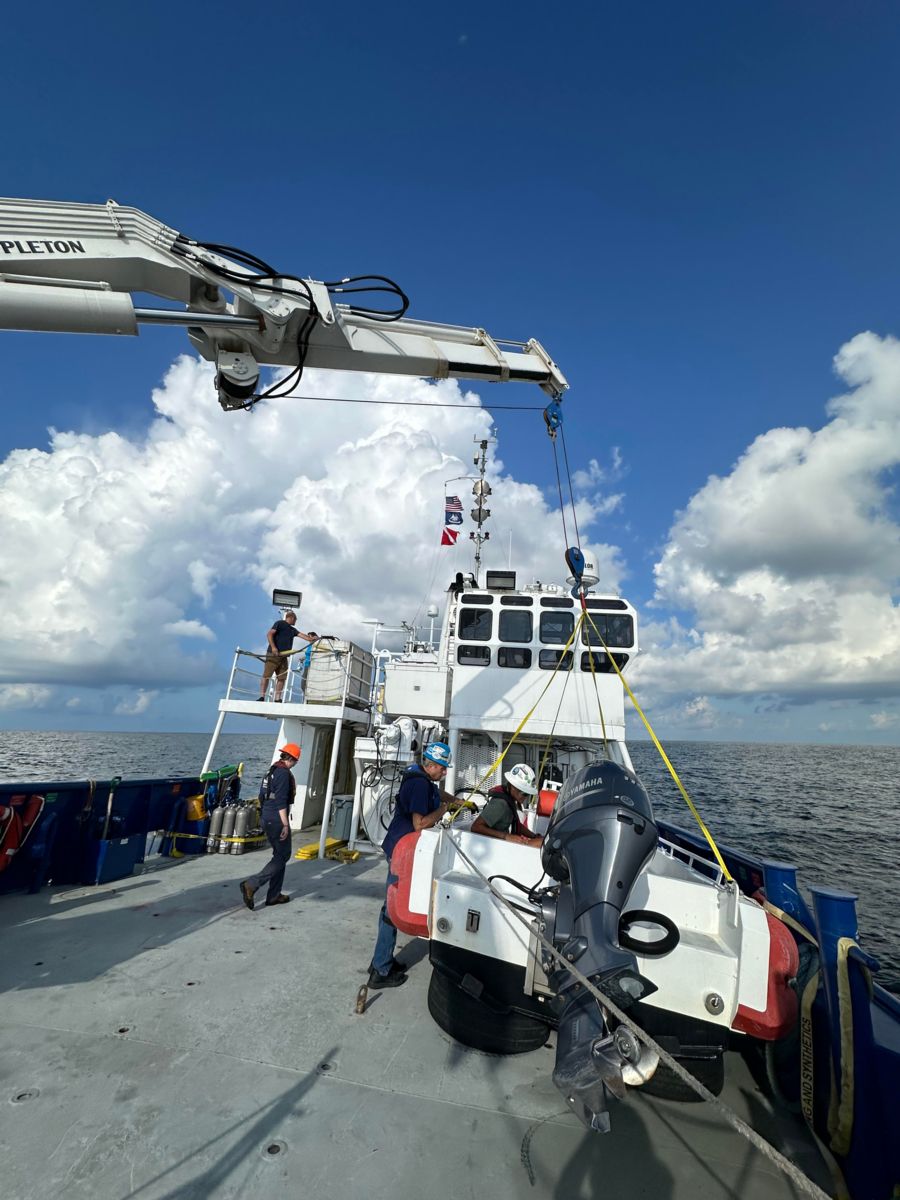
If currents were a safe speed, and the structure was safe to be tied to, we moved forward with the operation and would deploy the safe boat off the starboard side of Pelican. I helped with these deployments by running a tagline attached to either the bow or stern of the safe boat.
The science party went through the stations sampled and picked sites based off of their oxygen and turbidity conditions, as well as their proximity to an uncrewed fixed oil/natural gas platform. The oxygen and turbidity conditions were measured using SBE 43 and transmissometer instruments attached to the CTD rosette.
After the stations with the desired criteria were chosen, we started to transit to each of the sites. Once a station was reached, members of both the crew and science party would look at the uncrewed fixed oil/natural gas platform that had been previously selected and decide if it was actually a safe place to dive off of. The safety of the structure was determined based on whether or not the safe boat (the small boat that would be used to motor divers to and from the dive site) would be able to tie off to it.
Once the platform was deemed safe, the science party, myself, and Maggie, my mentor, would check the ADCP data for how strong (and in what direction) currents were throughout the water column. We would also refer to the data that was being collected by the Knudsen Chirp (a type of echosounder) to see how deep the water was at these particular locations.
If currents were a safe speed, and the structure was safe to be tied to, we moved forward with the operation and would deploy the safe boat off the starboard side of Pelican. I helped with these deployments by running a tagline attached to either the bow or stern of the safe boat.
The safe boat about to be deployed.
After the safe boat was in the water, we would move it forward to the CTD deck and tie it off on cleats. Once it was secured, I would help load dive gear onto the small boat, and help the divers get in safely.
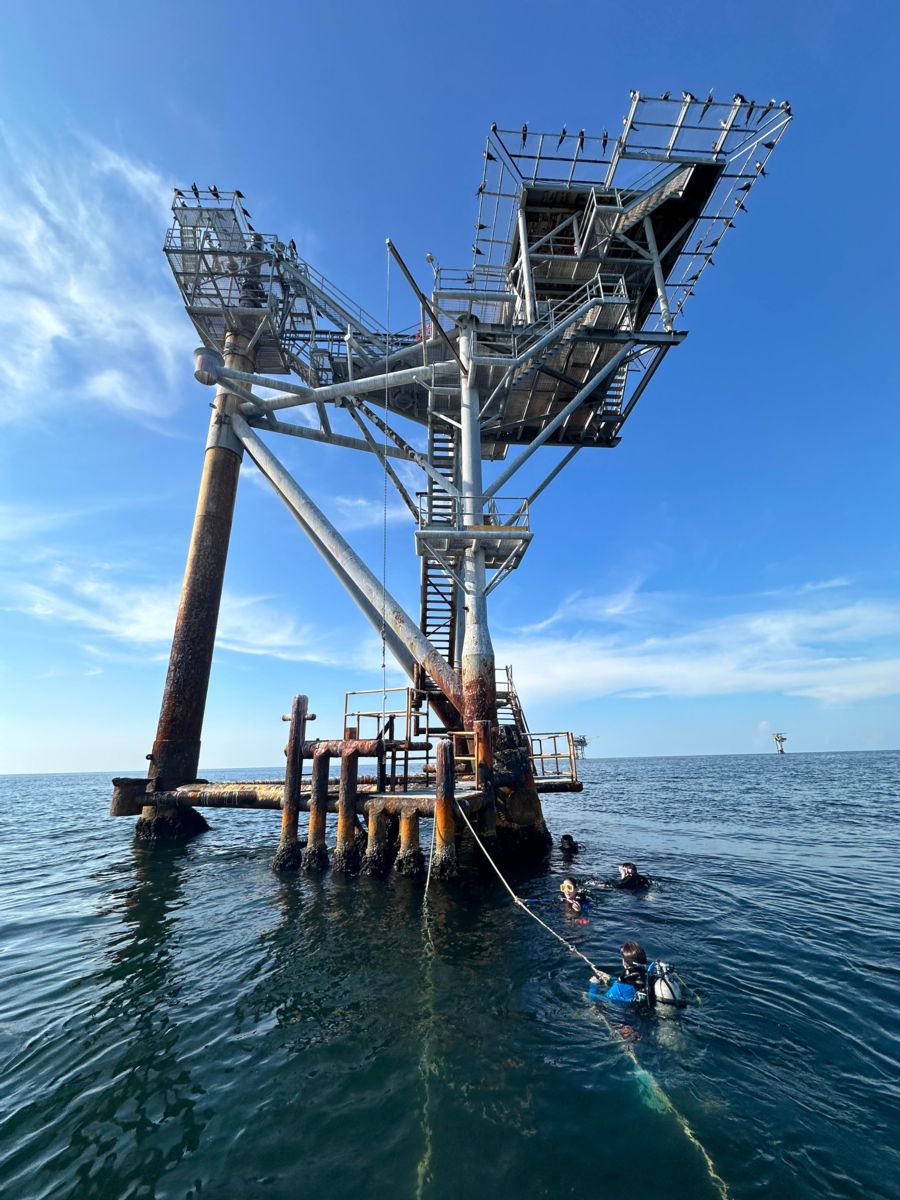
After everything (and everyone) was loaded, we would motor to the uncrewed fixed oil/natural gas platform, tie off to a piling, deploy the dive float, complete a safety briefing and go over dive plan, help the divers safely get into water, and hand them their gear.
After the safe boat was in the water, we would move it forward to the CTD deck and tie it off on cleats. Once it was secured, I would help load dive gear onto the small boat, and help the divers get in safely.
After everything (and everyone) was loaded, we would motor to the uncrewed fixed oil/natural gas platform, tie off to a piling, deploy the dive float, complete a safety briefing and go over dive plan, help the divers safely get into water, and hand them their gear.
My view from the safe boat that shows us tied up to the piling of an uncrewed oil/natural gas platform, and the divers about to start their descent.
While divers were down, Maggie and I kept watch for their bubbles to make sure that they were not drifting away from the structure.
Once the dive was completed, I helped divers load their gear and then get back into the safe boat.
We would then motor back to the Pelican, load dive gear back onto the back deck, and help the divers get out of the safe boat. Once the divers were safely back on the vessel, then I would get out and help with tag lining the safe boat back onto the back deck.
I was very excited to be a small boat co-operator as I have not been a part of this type of operation on previous cruises. These operations allowed me to practice: unit conversions (converting between knots and meters per second), operating taglines, tying knots, and radio communication skills. I also learned a lot about the logistics behind– and execution of– scientific dive operations.
Prior to this internship, I had only ever been on cruises that took place in the Northeast Pacific. Experiencing a different region of the ocean has been really fun. I had never seen oil rigs or so many large shipping vessels in person before. It’s a different world over here in the Gulf of Mexico!
The shelf-wide hypoxia cruise ended very early the morning of August 1st. It was cool to observe how the vessel gets tied up to the dock. There is a lot of communication and coordination that needs to happen before, during, and after this event happens. This was the first time I was able to see how a boat gets docked from the Bridge (where the Captain and Mate sit in order to operate the vessel), as well as watch the lines get thrown from the vessel to shore. After docking, we worked on demobilizing, as well as mobilizing for the next cruise. I helped with rigging and operating taglines on the equipment that was being offloaded.
The science party departed the vessel at 08:00 CT on August 1st. From 08:00 to 14:00 CT, Maggie and I worked to address Wi-Fi network concerns, and practiced maintenance procedures for the CTD setup and Flow Through System to get them prepared for the next cruise. Alongside routine maintenance procedures, we also performed a Deck Test of the CTD as we had rearranged the instrument configuration. This was done because some sensors needed to be sent back to SeaBird, an oceanographic instrument manufacturer, to be recalibrated.
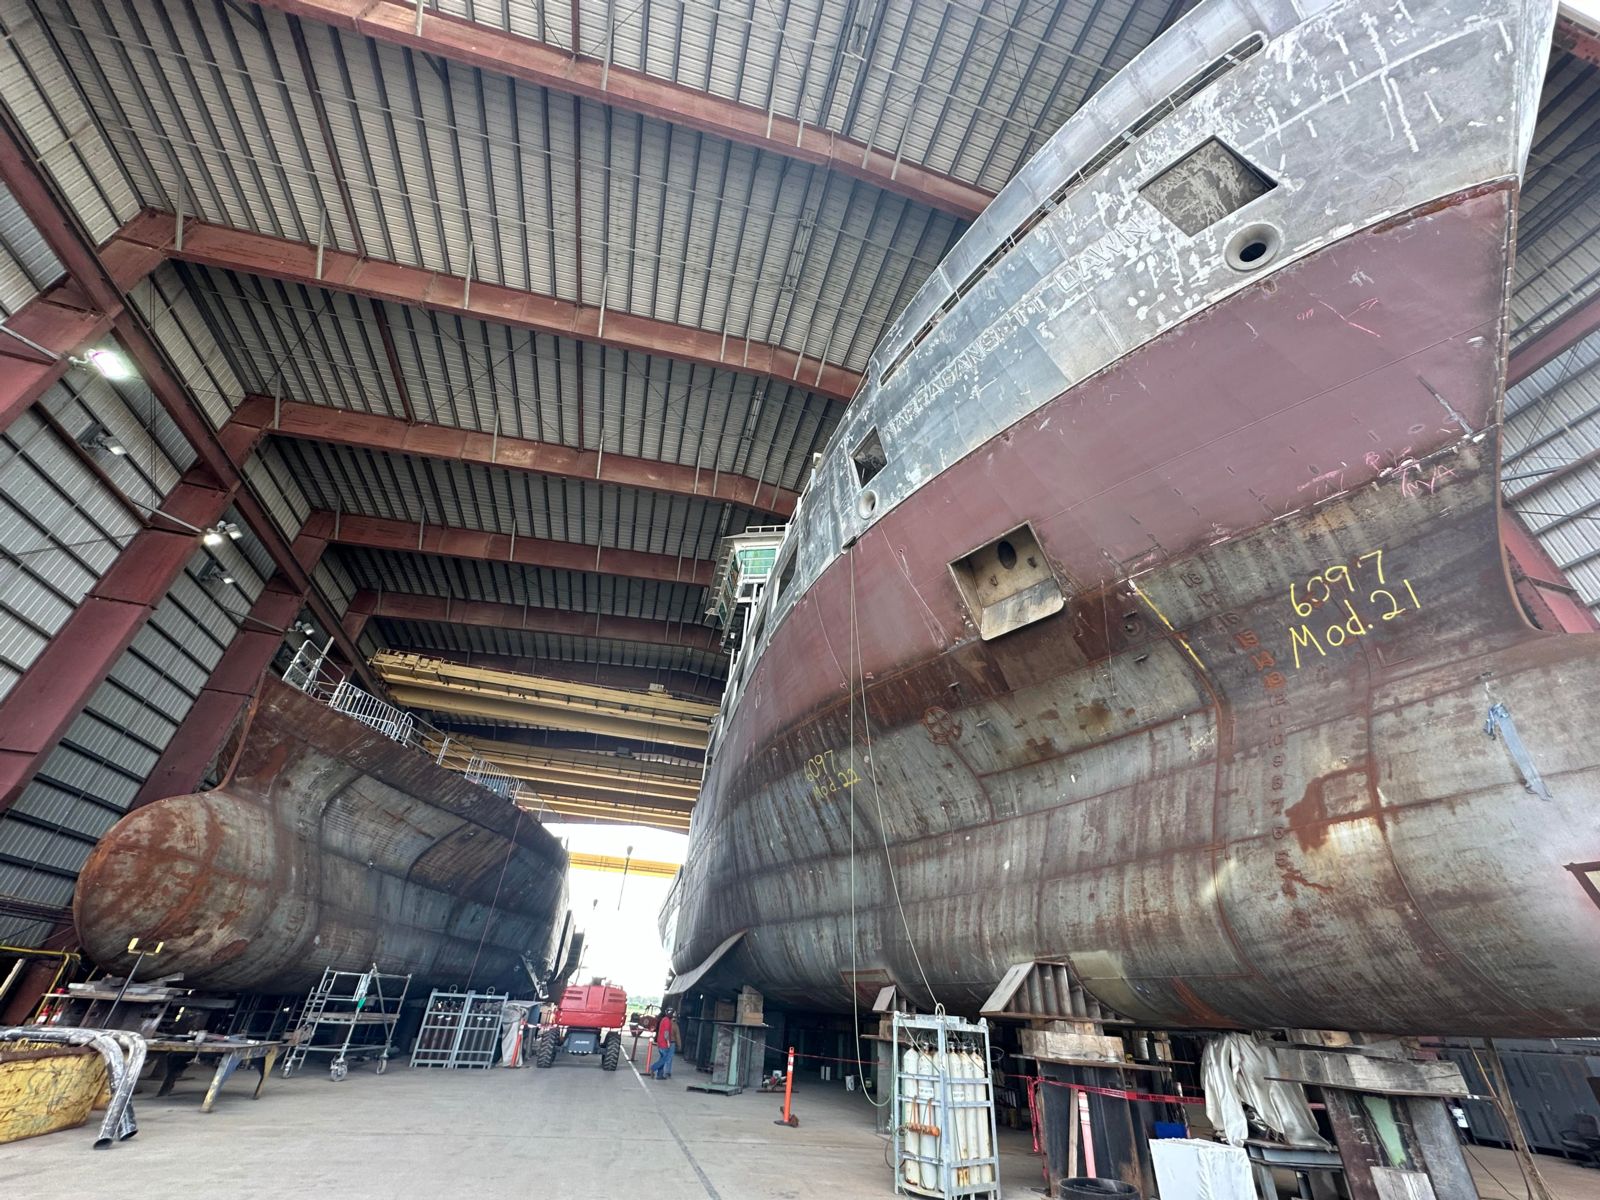
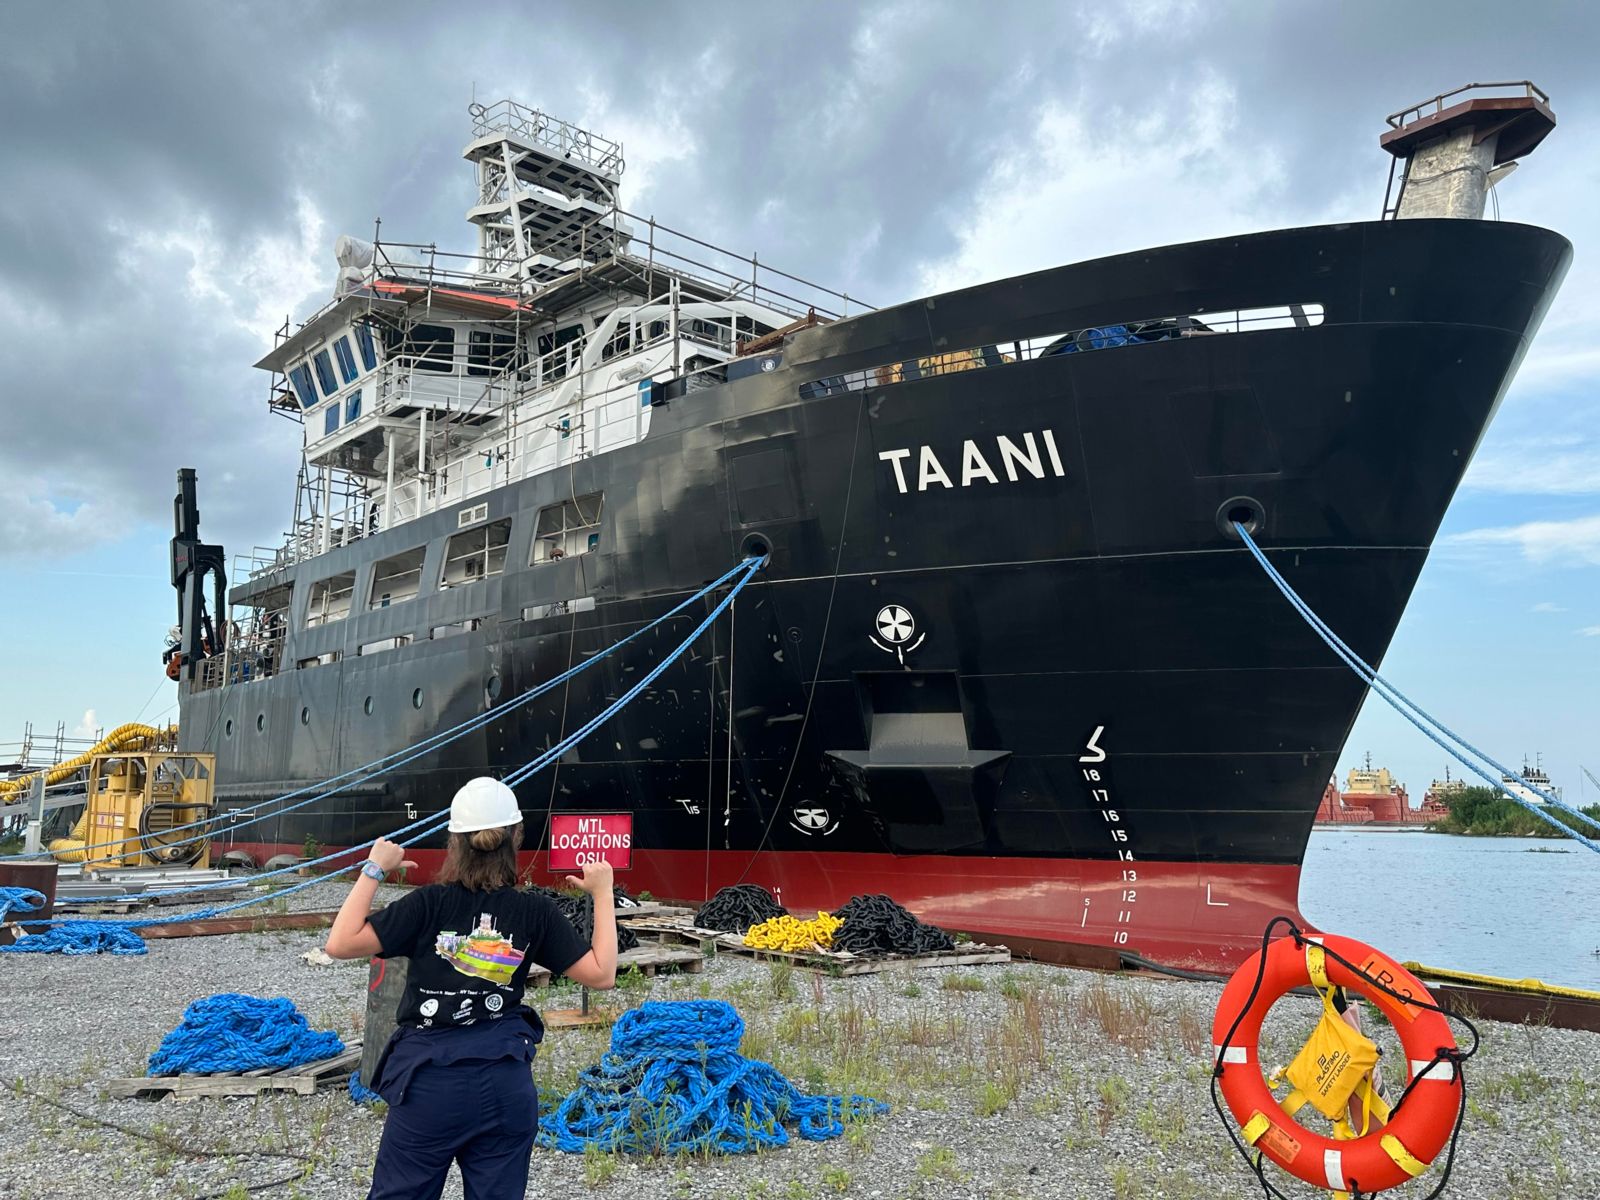
After 14:00 CT, we made our way to Houma Bollinger Shipyards. To those who aren’t familiar, this is the shipyard where the new Regional Class Research Vessels (RCRV) are being built! The three ships in this fleet are: R/V Taani, R/V Narragansett Dawn, and R/V Gilbert R. Mason. It was incredible to see this project in real life. Having read and heard so much about this program and the vessels being constructed, I was in awe while seeing it in person. In fact, I have an RCRV shirt that I was given through my position at the Ocean Observatories Initiative’s (OOI) Coastal Endurance Array. I brought it with me in hopes that I would get a glimpse of the R/V Taani at some point. I did not imagine that I would be able to visit the shipyard, let alone tour the inside the vessel!!!!
I am so grateful to all of the folks that made this tour possible, especially Kristin Beem. Thank you for staying after your work day had ended to give us a tour. I am glad that I was able to meet you, you are a force in the field. All of the information that you gave my group about the capabilities of the RCRVs will stay with me for a long time. I’m excited for the future of ocean research, and hope that I will be able to sail aboard them one day.
(I will try to make another blog post about what I learned on the tour itself! It will take me a while to write if it does happen:)).
Looking at the bows of the R/V Gilbert R. Mason (left) and R/V Narragansett Dawn (right)!
My RCRV shirt in front of the R/V Taani. (I don’t think I’ll ever get over being able to go and visit the R/V Taani while it was still under construction. It was an incredible experience!!
After an awesome port day of learning and visiting the shipyard where the RCRVs are being built, we completed the mobilization of the Pelican for the next cruise.
During this process, I successfully imported the station coordinates from UNOLS Cruise Planner into the navigational software that both the crew and science party use. I was proud of myself for being able to apply this knowledge, as this was a process I learned during the last cruise.
This new science party is deploying acoustic moorings throughout the Gulf of Mexico with the overarching goal of gaining a better understanding of the underwater soundscape of the region. If you’d like to learn more about this project, you can check out their website: https://sioml.ucsd.edu/.
We departed at 16:00 on August 2nd, the sunset as we left the dock was beautiful!
The sunset on our way out of the Bayou and into the Gulf!
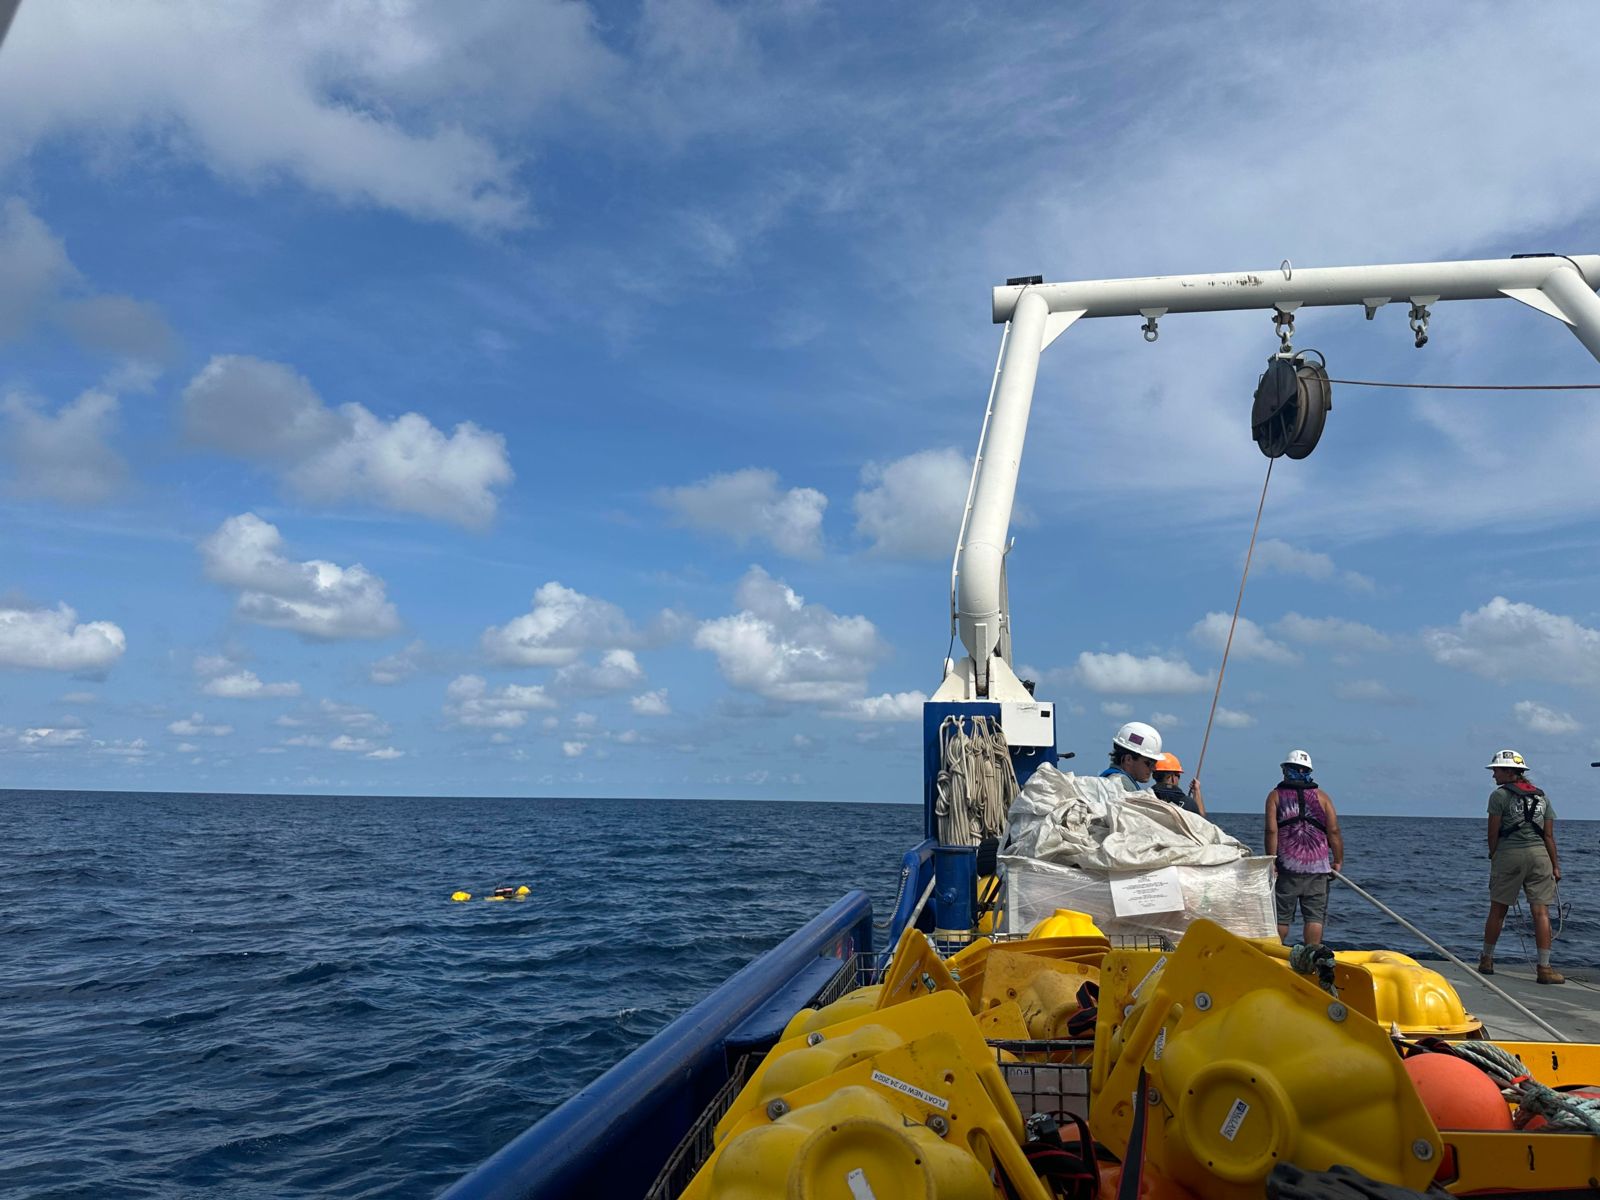
Next morning, the first recovery and deployment of the cruise was completed! I am excited to be learning more about deck operations during this cruise!
This was the first mooring that we recovered for the trip.
I’m excited to see what I will learn on this next cruise, talk to you next week! 🙂


.jpg)
.jpg)


 Here are what the SBE 32 and “latch head assembly” look like!

 From left to right: A close-up image of the sheave, me installing the magnetic induction sensor, the magnetic induction sensor after being installed.
